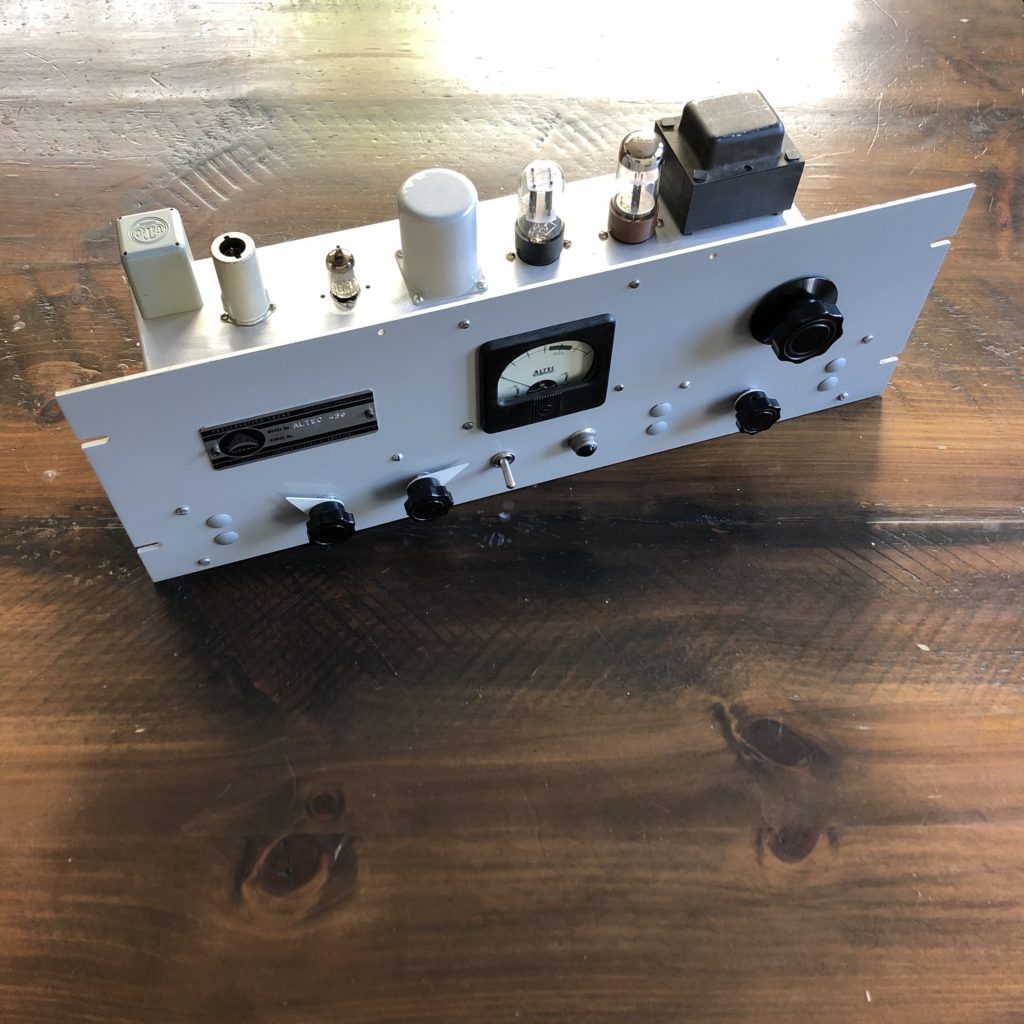
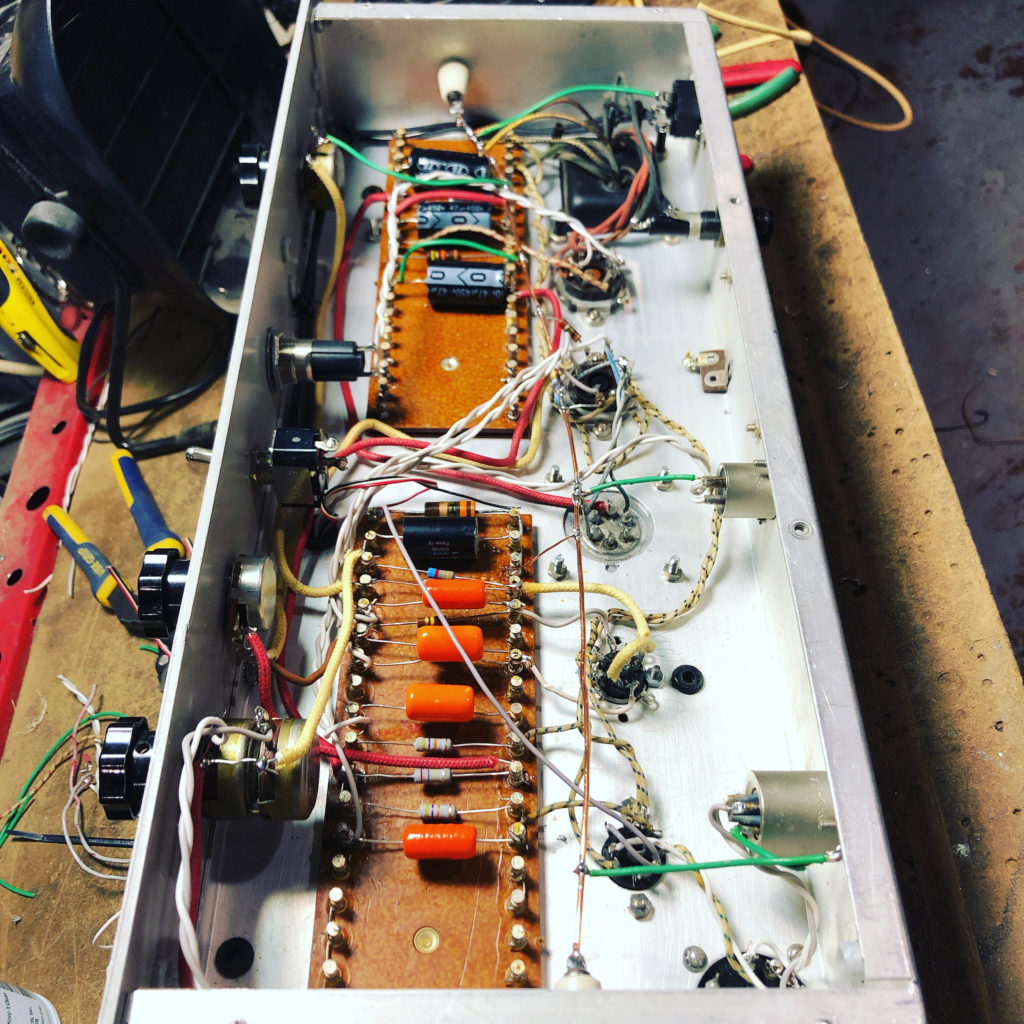
I’ve serviced and modified many Altec 43X-series compressors over the years, but I think this may be only the 2nd one I’ve built entirely from scratch. Styled more like a Federal AM864, this unit incorporates many of the tweaks and modifications that I have come to like in these machines. Here are some images of the build.
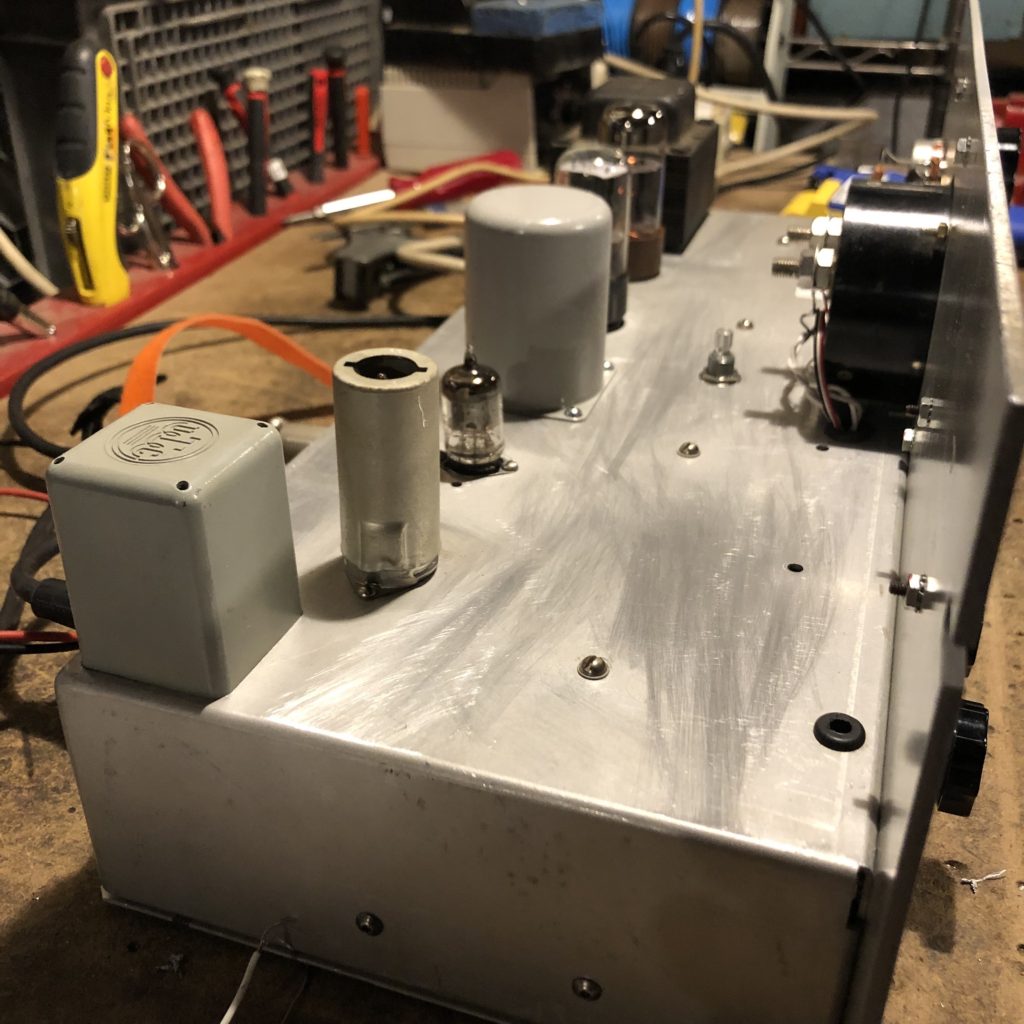
Couple of things to point out in the photo above. Note the larger “Octal” tubes (6X5 rectifier and 6SN7 output amplifier) on the left side. I like octal tubes, as the larger sockets are easier to work with, so space-permitting I tend to use them. The original 43X used a solid-sate rectifier (with a voltage doubler) but I used a more conventional full-wave supply with a rectifier tube since it suited the look better. The 6SN7 output tube was a nice choice as there are so many variations of this tube available. It’s a direct sub for the 6CG7 in the original Altec.
Also note: behind the meter is a ‘meter null adjust’ pot. I can’t recall how this was handled on the original Altecs, but this mod is a common one shown on many internet schematics of the 436. Also note the large pot to the left of the meter. This is the Gates Sta Level output trim control (-6 to -14db cut) that I detailed on this site years ago. A worthy and necessary addition!
You can also see the enormous output transformer in the center: a massive potted unit built for Daven, likely by UTC. originally built for hi-end test gear, it is ultra hi fi and handles more level than this thing will ever see.
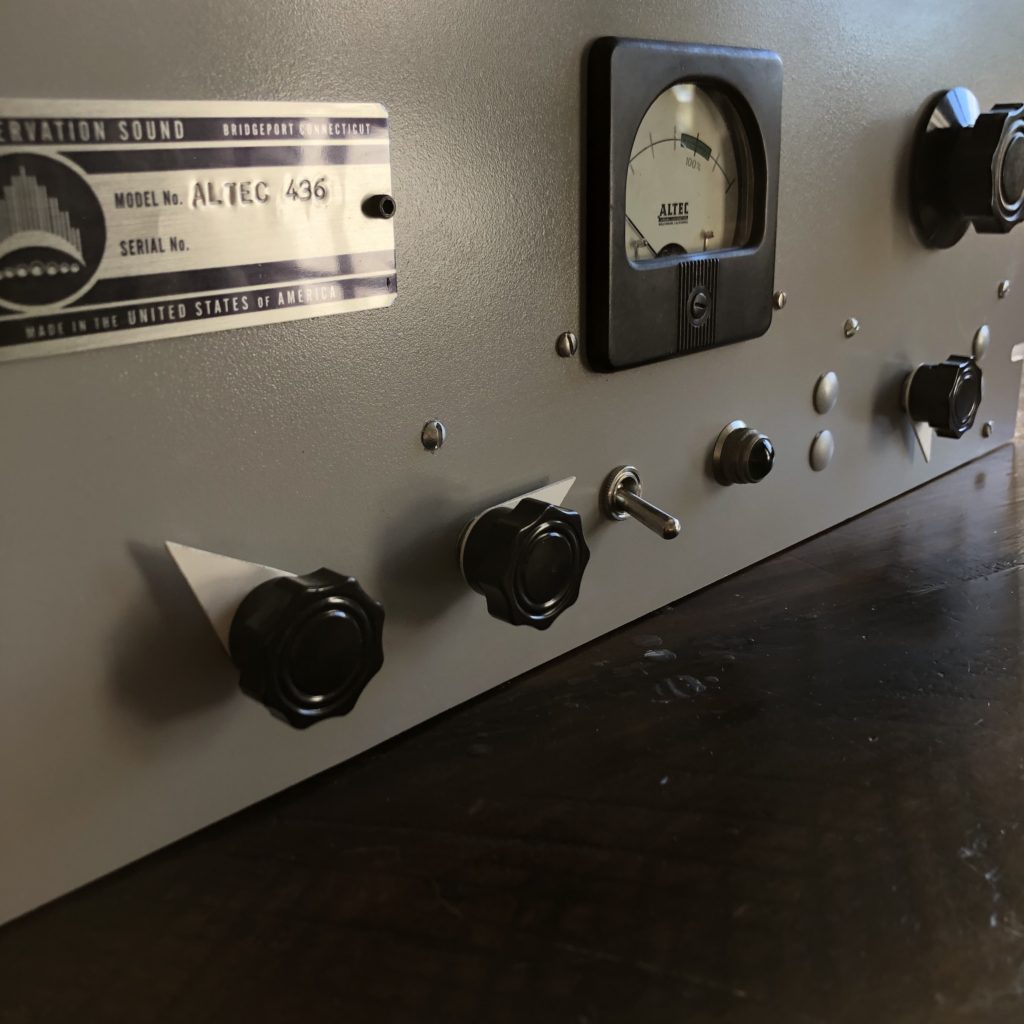
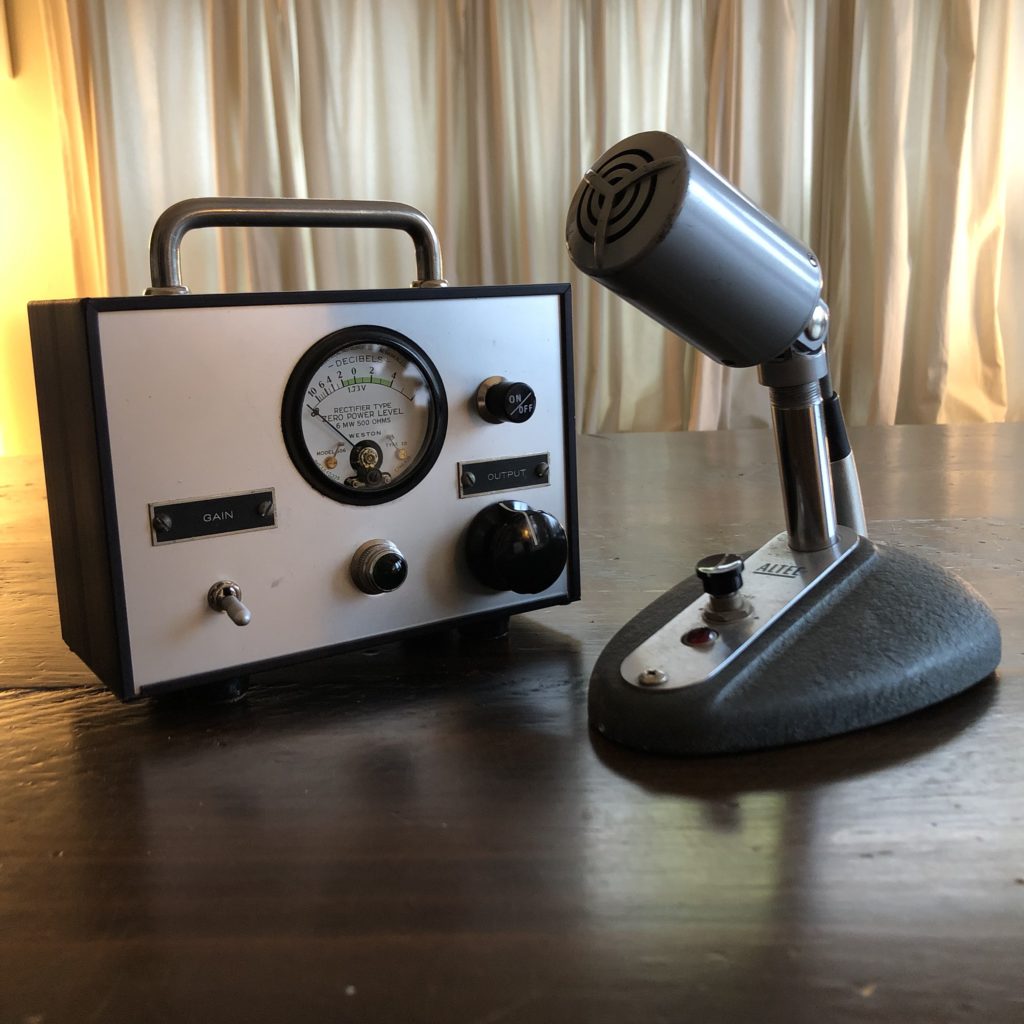
Above: some detail of the meter. I was motivated to build this thing solely because I found that original Altec panel meter at a hamfest for a buck. Seemed like it needed a 2nd life… Also check out that finish on the panel! That’s about 6 layers of paint and 3 layers of clearcoat, sanded between each coat. The knobs are all NOS 1960s DakaWare, acquired from Park Distributors in BPT CT (RIP).
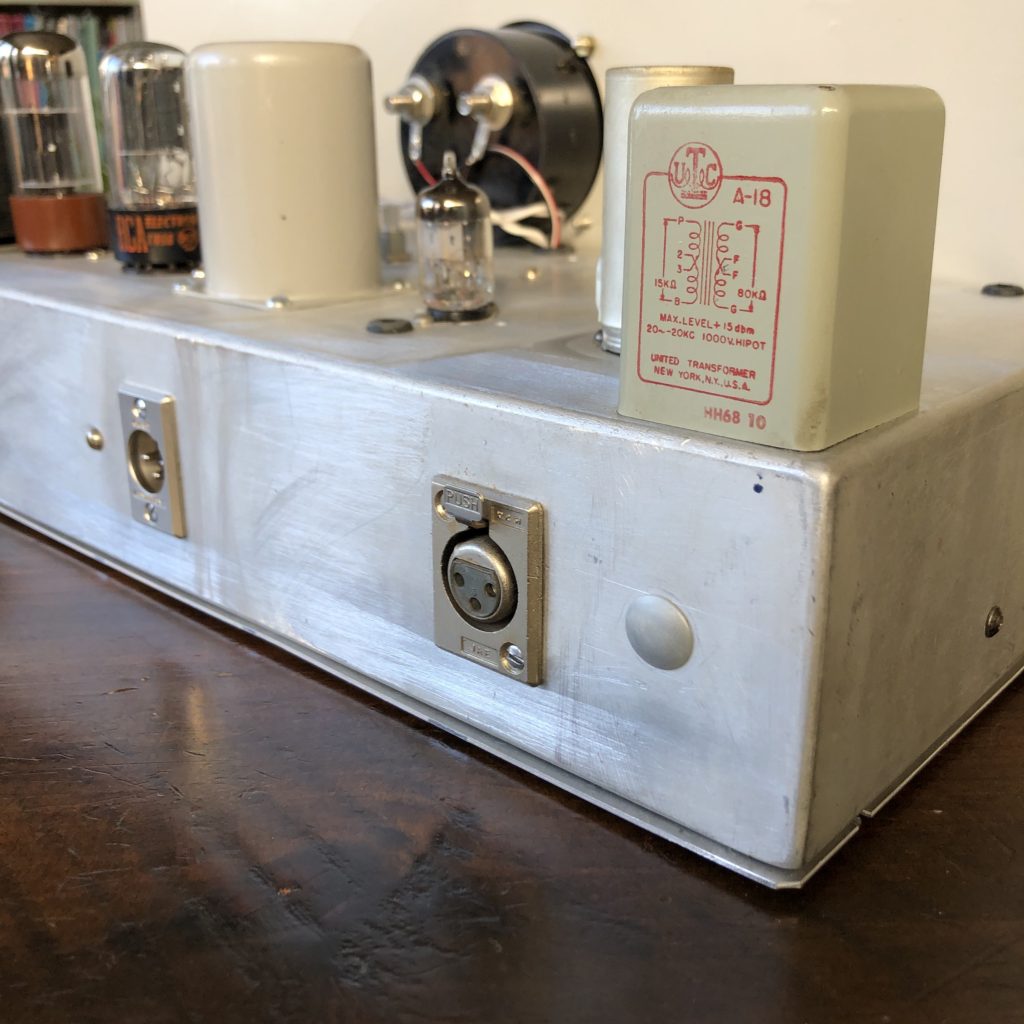
Above: the UTC A18 input transformer, which has similar specs / ratio to the Peerless plug-in unit that an original Altec would have been outfitted with.
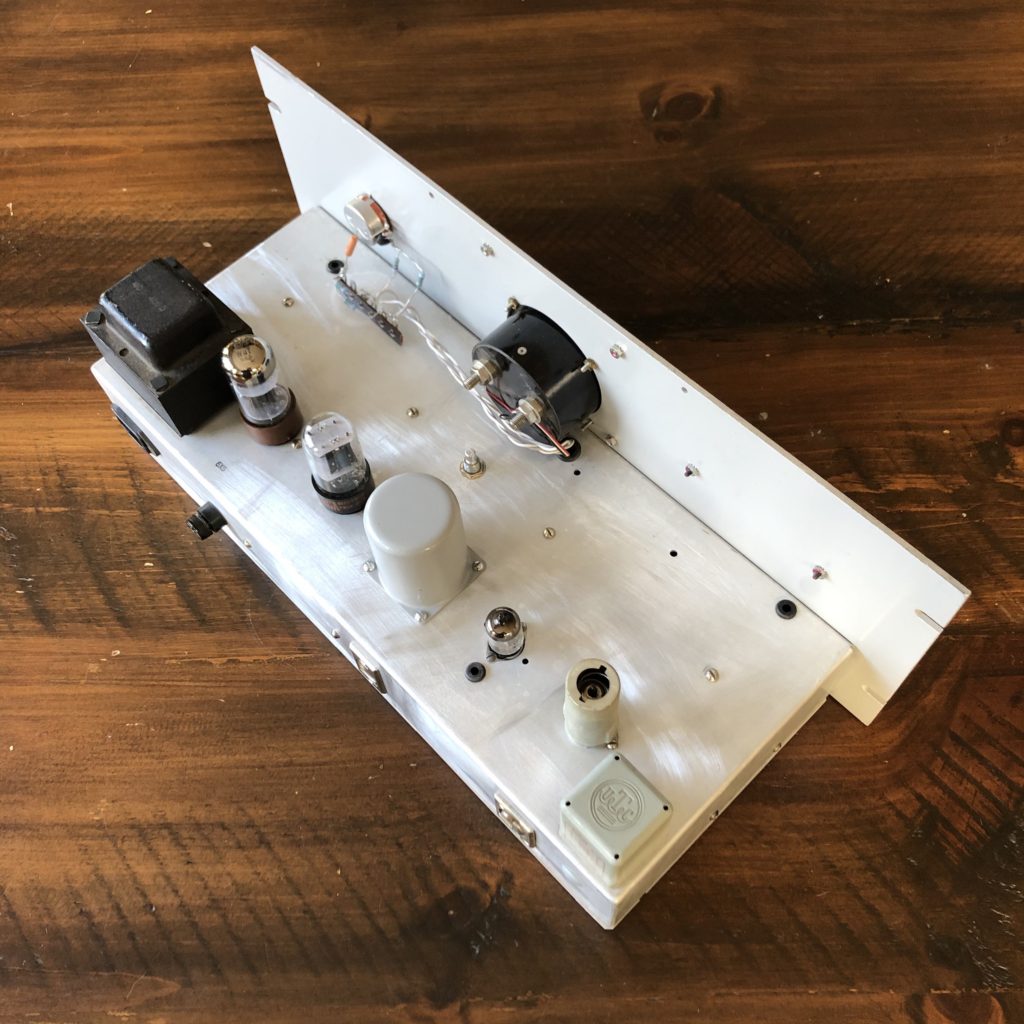
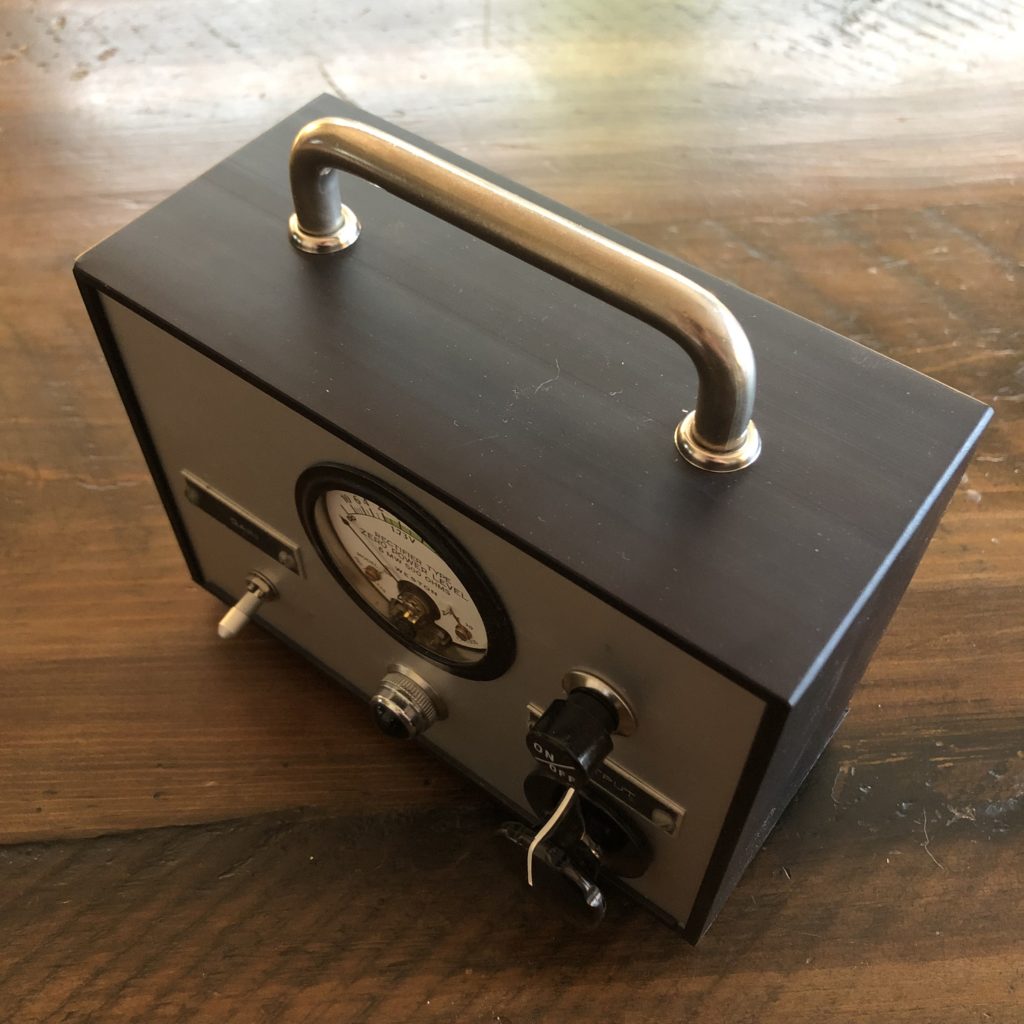
Above: the completed unit on the bench. The input pot is a really nice dual-gang 50K 1-watt sealed unit; I got several of these from Park before they closed. I cant imagine that any pot like this is available today for under $50. Good find. Running the length of the unit to the immediate right of the turret board is the heavy copper ground buss. Every ground in the machine connects here, and only here, and the ground buss meets the chassis at only one spot – the input jack. I swear by this construction technique. I’ve rewired a lot of old cheap tube guitar amps with this addition and the improvement in noise floor is remarkable.
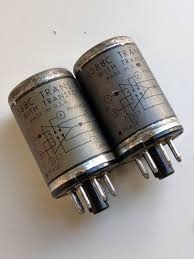
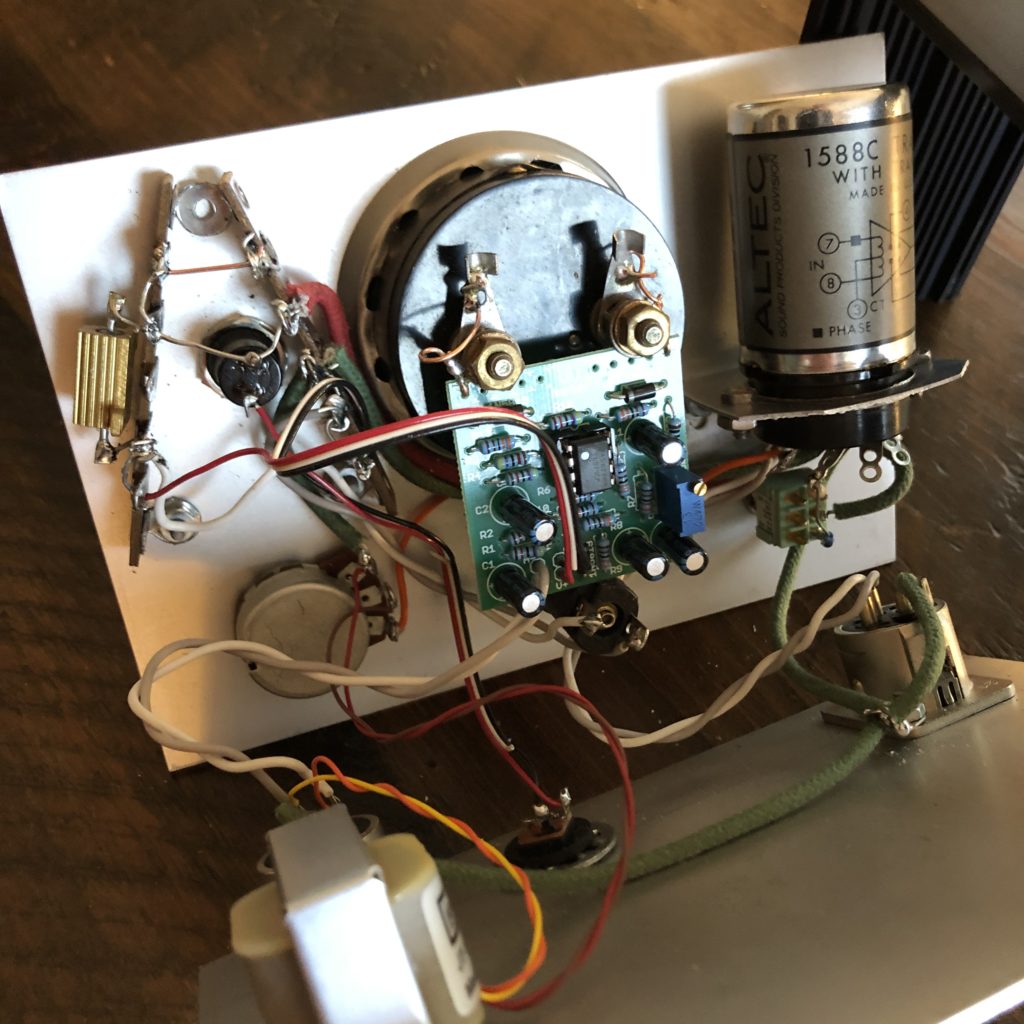
This is my first post using this intensely frustrating new WordPress “Blocks” authoring structure so it will brief/awkwardly formatted. Why TF they would change this platform so drastically after all these years is beyond me but I guess there is no shortage of bad ideas in the world. OK got that out of the way. I was recently reminded of the existence of (many, many, many) of these Altec 1588C microphone preamp modules.
(image source) The 1588C is an octal module with flexible DC powering requirements and offers around 35DB of gain into a 10ohm load. According to the spec sheet it is full-frequency. It has an input transformer and can pass the DC supply voltage as phantom power if wired as such. Years ago I had an Altec 1592 mono sound-reinforcement mixer that used these things; it sounded fine.
Anyhow, some post on Instagram reminded me that these things are out there; a quick eBay check revealed that they are very cheap (if you are patient); I bought three for around $30 shipped. Here’s the original data sheet.
It occurred to me that if these things really do perform as well as advertised, they COULD make a good basis for the custom mixing console i’ve been dreaming about for, oh, 15 years. But first: I had to know. I needed to build some thing to test the 1588’s and see if they really do perform well and sound good.
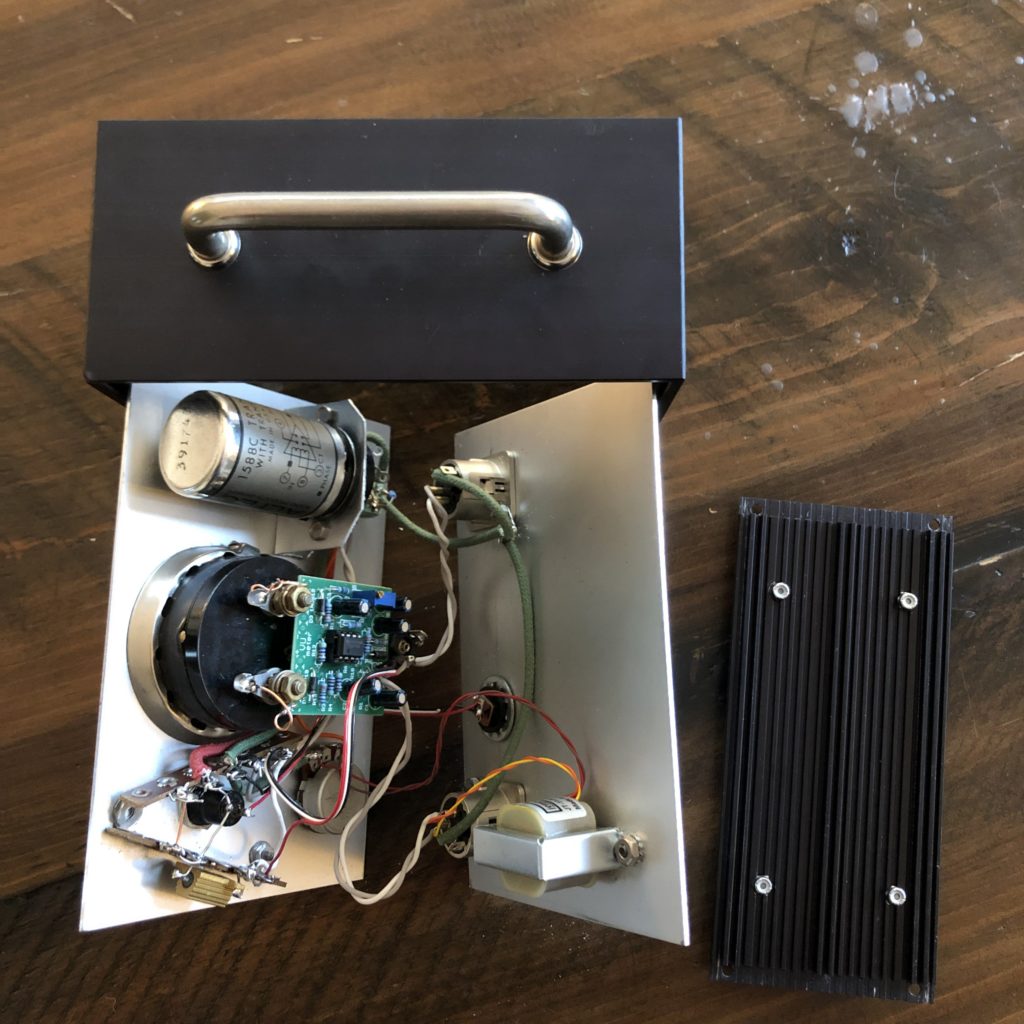
Following the advice offered in this online forum, I figured I would wire one up with a 1K pot strapped to the output, feeding a high-quality 600:600 transformer. The best thing I had around that would fit in the tiny chassis was a Jensen JT-11-FLCF. Here’s the specs on that piece:
Since everyone likes a vintage mechanical VU meter, I added one of those too, driven by a buffer amp from DIY–TUBES.com. I’ve bought dozens of these lil amp boards from them and they go together quickly and work great.
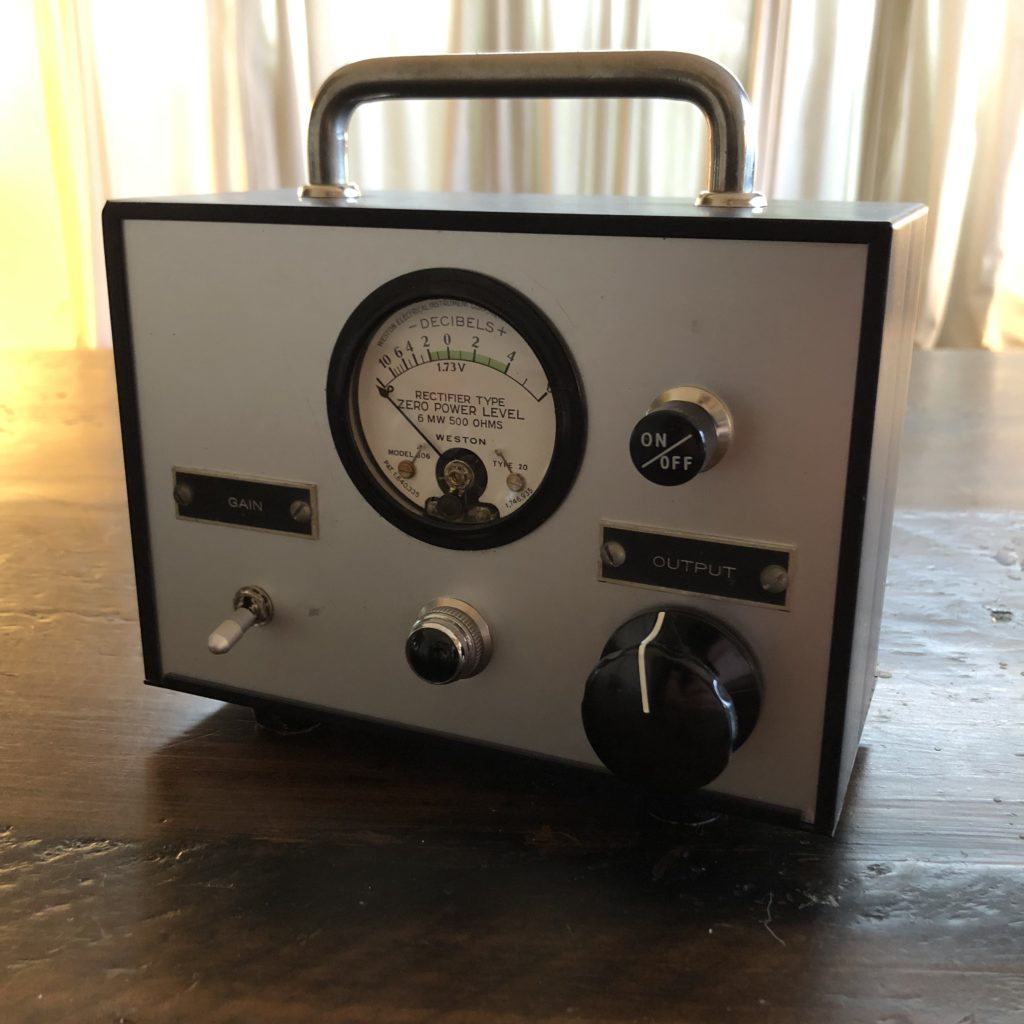
Here are some photos of the assembled unit so you can see how it all went together. The chassis is a (was a) NOS NIB “Versa-box” or something like that; it came from an ancient distro in my city. I don’t thing you can expect to find many of these left in the wild, but any old steel, aluminum, or plastic box should do. The RCA-style knob (SATO brand) and pushbutton power switch came from Akihabara in Tokyo; I’ve been unable to find an online source for them. The top handle is an old pull, probably ParMetal or the like, with a pair of beauty washers (AMAZON) to help the appearance. The ‘GAIN’ and “OUTPUT’ metal tags are from a huge hoard of these I bought from the estate of a Silent Key; I have no idea where to find these, but someone should start making these again! (i mentioned the idea to RedCo but they weren’t interested)
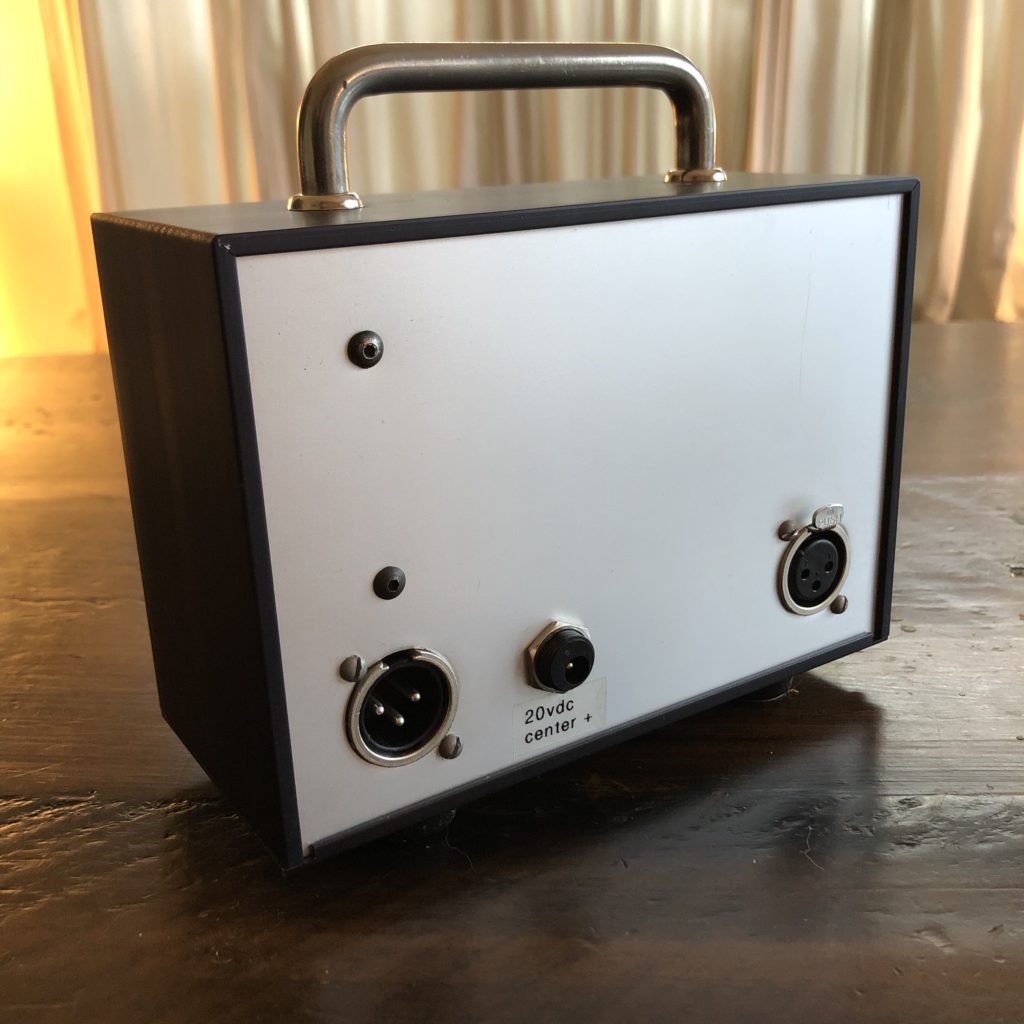
As the photos reveal, the case is comprised of a U-shaped black body with a bolt -on bottom cover; the front and rear faces are polished aluminum and simply slot into channels in the body. VERY sturdy and attractive. If anyone know of a comparable modern product line, please LMK in the comments.
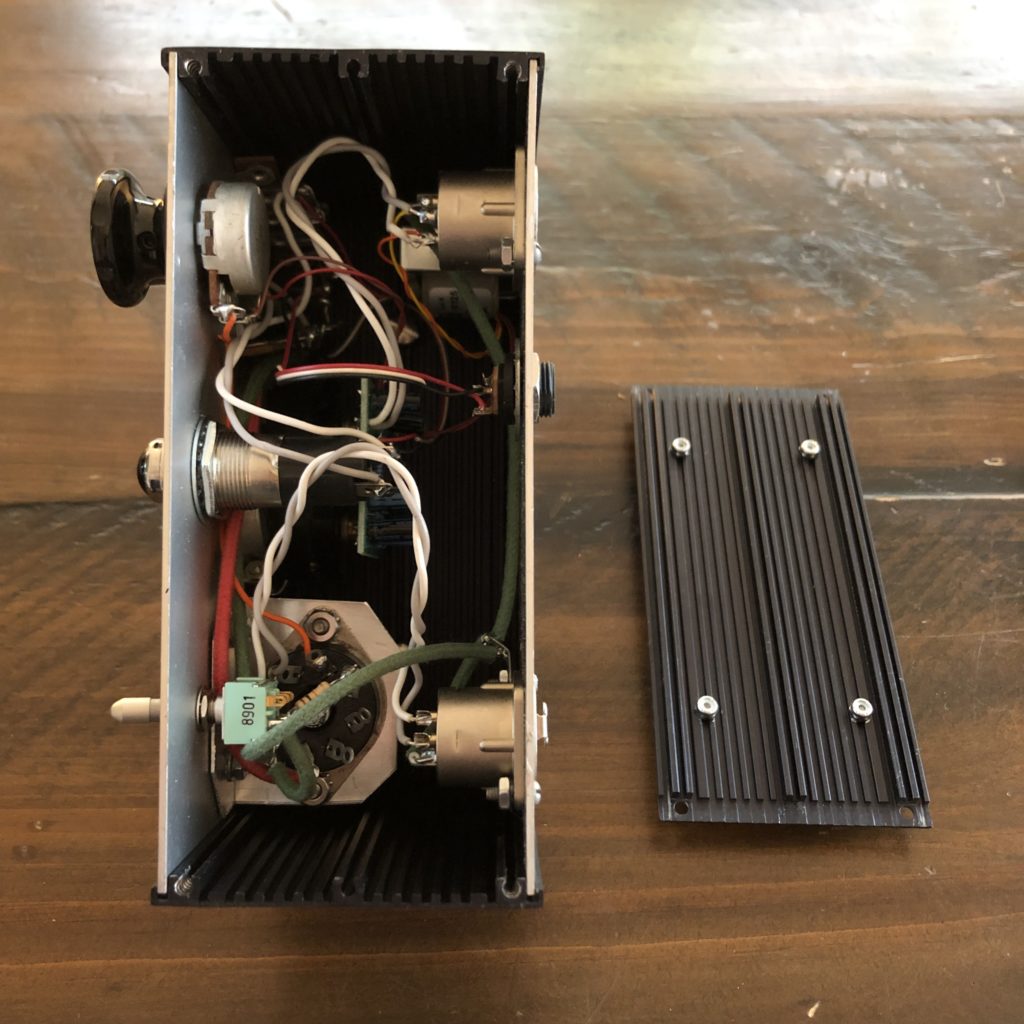
In the photo above (front panel, rear view) you can see the the pot on the lower left; above is the power switch and a 5W 40-ohm resistor that drops the 20VDC from the regulated Dell Laptop supply (free at a hamfest!) to around 11 volts to power the VU buffer amp and the 14v lamp. This is certainly not the most elegant solution (ESP because when/if the bulb fails, the power to the buffer will spike to around 19V), but I couldn’t make the required voltage drop happen with a voltage divider since the DC resistance of the bulb is so low (5 ohms!). Any advice on this that does not require a voltage regulator, pls LMK in the comments…
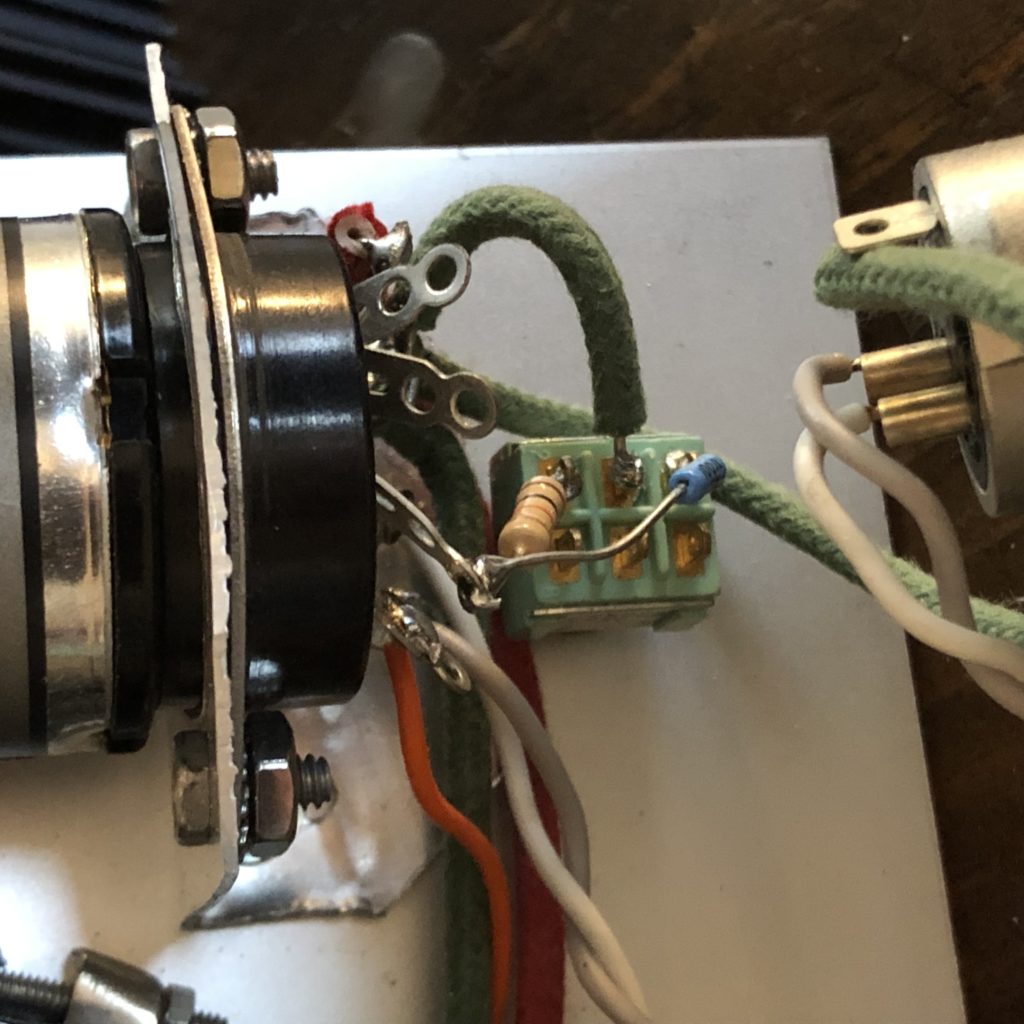
Anyhow, on the right is the 1588C module, mounted in a standard octal tube socket. The switch below selects if pin 2 sees ground thru either a 100 ohm resistor (‘hi gain’) or a 10K resistor (‘low gain’).
The switch itself is pretty neat; vintage Japanese NOS unit with gold contacts and a ‘pull’ shaft, IE., you need to pull the shaft toward you in order to change its position.
So that’s about it… the sound is very good; very clear, very low noise. Will def be usable for recording. Unfortunately, the frequency performance of the unit is nowhere near the stated specs. Why this is I am unsure. The only external elements in the signal path are the pot and the Jensen Transformer; I certainly trust the stated specs of the Jensen, and if the source impedance of the 1588C is truly 10 ohms, it should have no problem driving a 1K pot. Based on what I’ve described of its implementation here, if anyone knows for sure what the issue is, please LMK in the comments. Anyhow, here’s my test results obtained with the completed unit; I use a LofTech oscillator and a Ward Beck meter for measurements. Signal ref is sine, -40db, 1K hz.
Max gain (low; 10K fb res) = 28.5 fb
Max gain (high; 100ohm fb res) = 38db
Max clean output +14 db
High end down 1db at 7K, 2db at 10k, 5db at 15K, 6db at 20k
Low end down 1 db at 100hz, 2db at 40hz, 3.5db at 20 hz
One final note, and important if you attempt to do this same sort of thing. Of the three 1588Cs that I got in that $30 lot (one used, two in-the-box, advertised as NOS), only one worked well – the first two I tried had issues. The first had a very subtle high-frequency whine, and the other had a non-functional gain pin (it was stuck in a low-gain setting, likely indicating a short within the unit). If I had not had extra 1588Cs around, this would have been an intensely frustrating exercise.
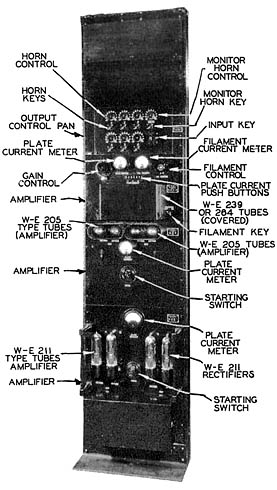
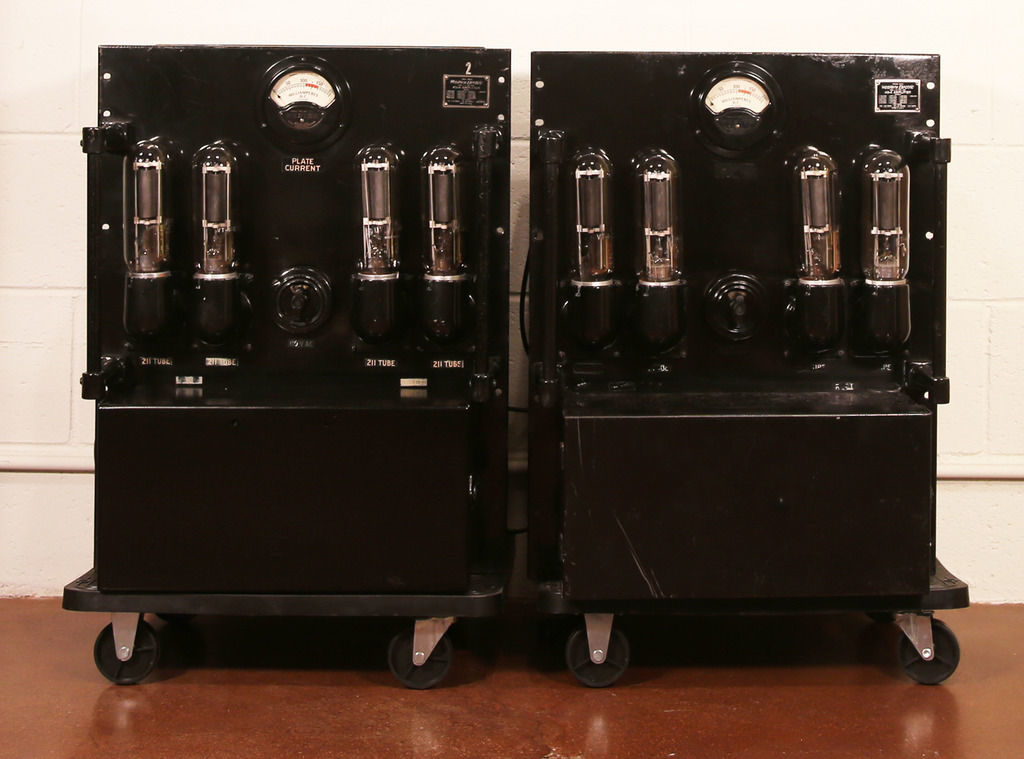
Above is the original context in which the 43A would have been found – it’s the piece on the bottom – and this entire massive apparatus represents a single 20-watt audio playback channel, with all associated power supplies, preamps, and control devices.
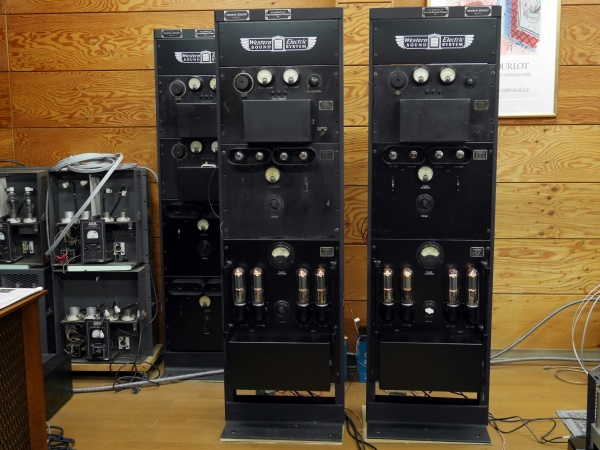
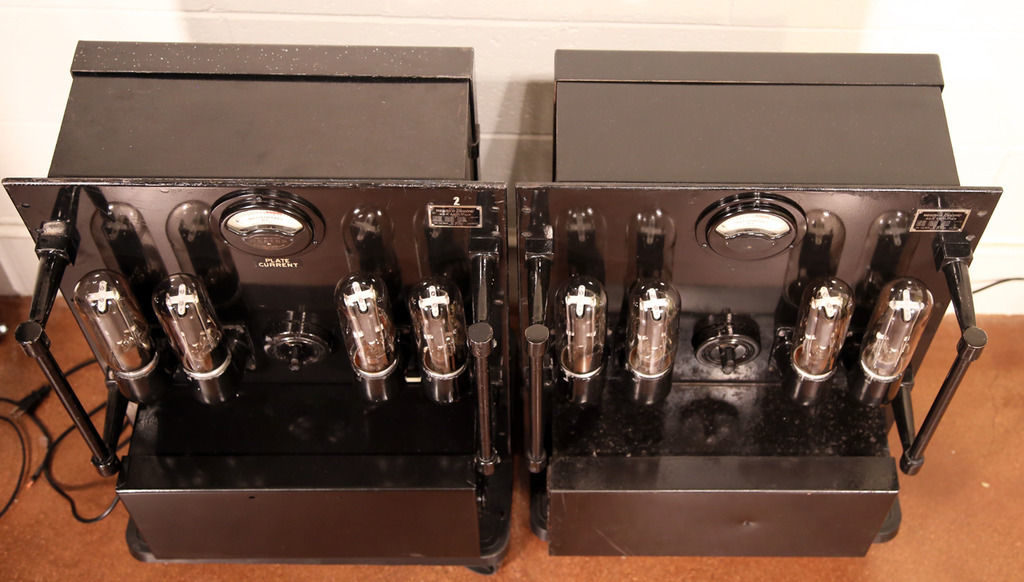
I don’t have a clear sense of how many 43A were made, so I don’t want to add to internet ‘swirl,’ but there can’t be too many out there. Above is a pair of 43A that sold in 2016 on eBay for $32,000. IMO This is a very fair price for such an incredible piece of history, but it’s not a sum I, or many people, are prepared to spend on a hifi amp; hence the idea to create this tribute piece.
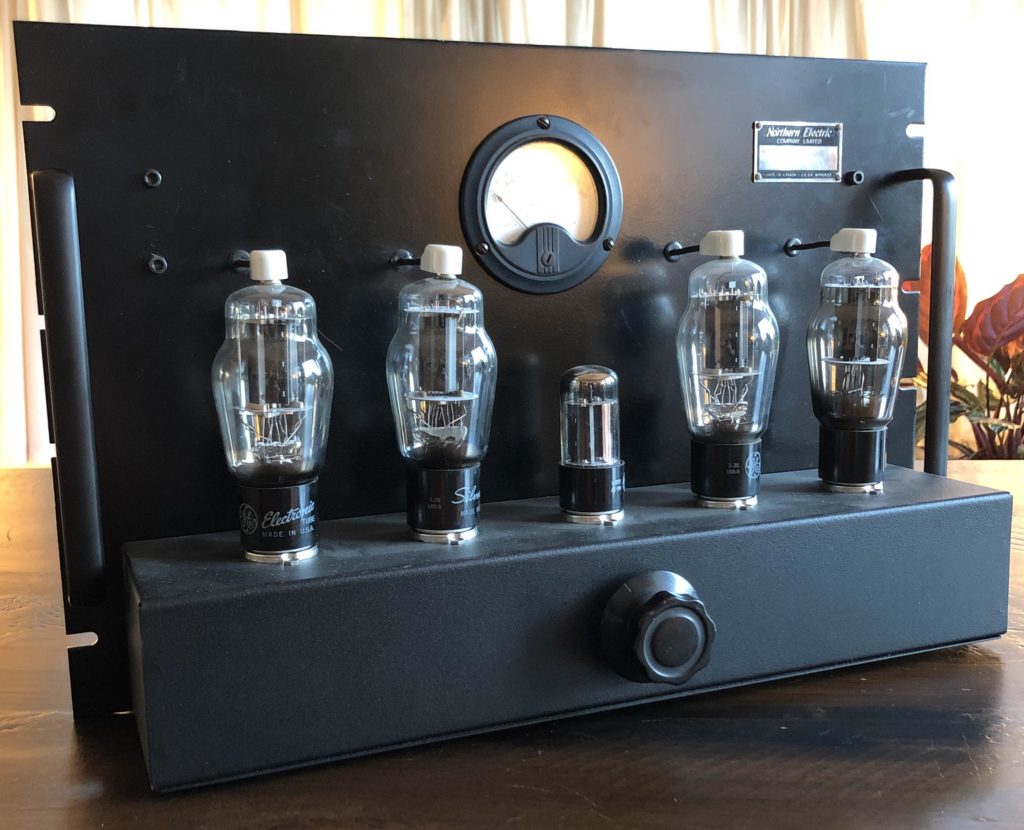
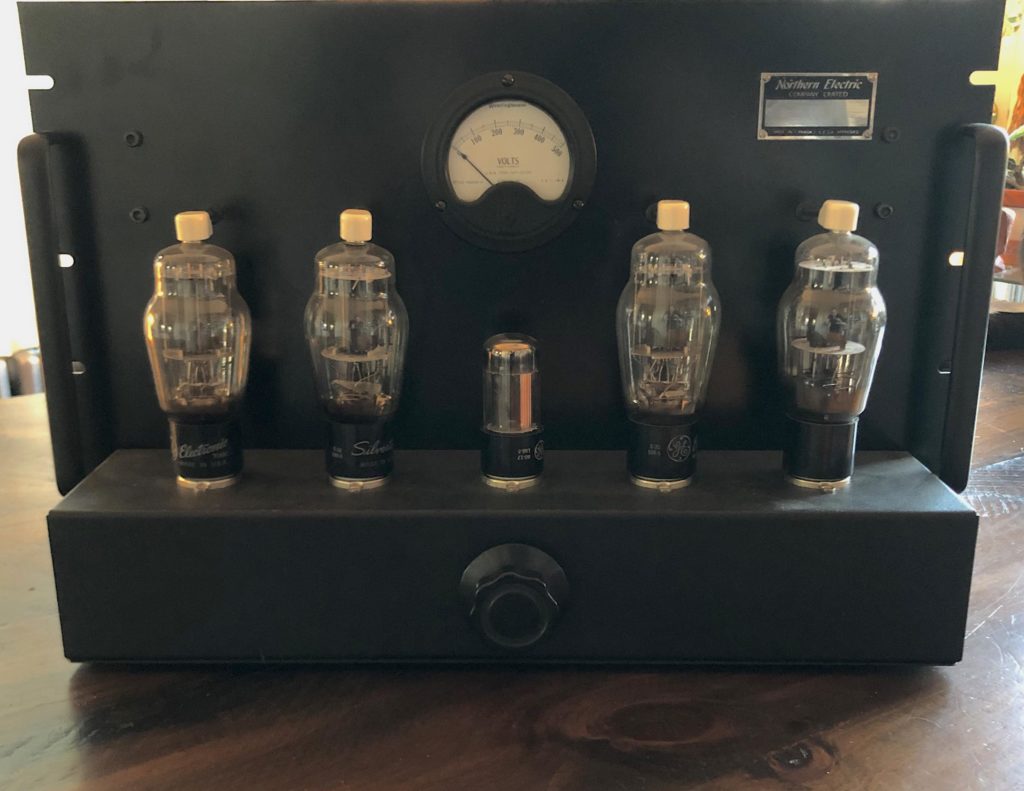
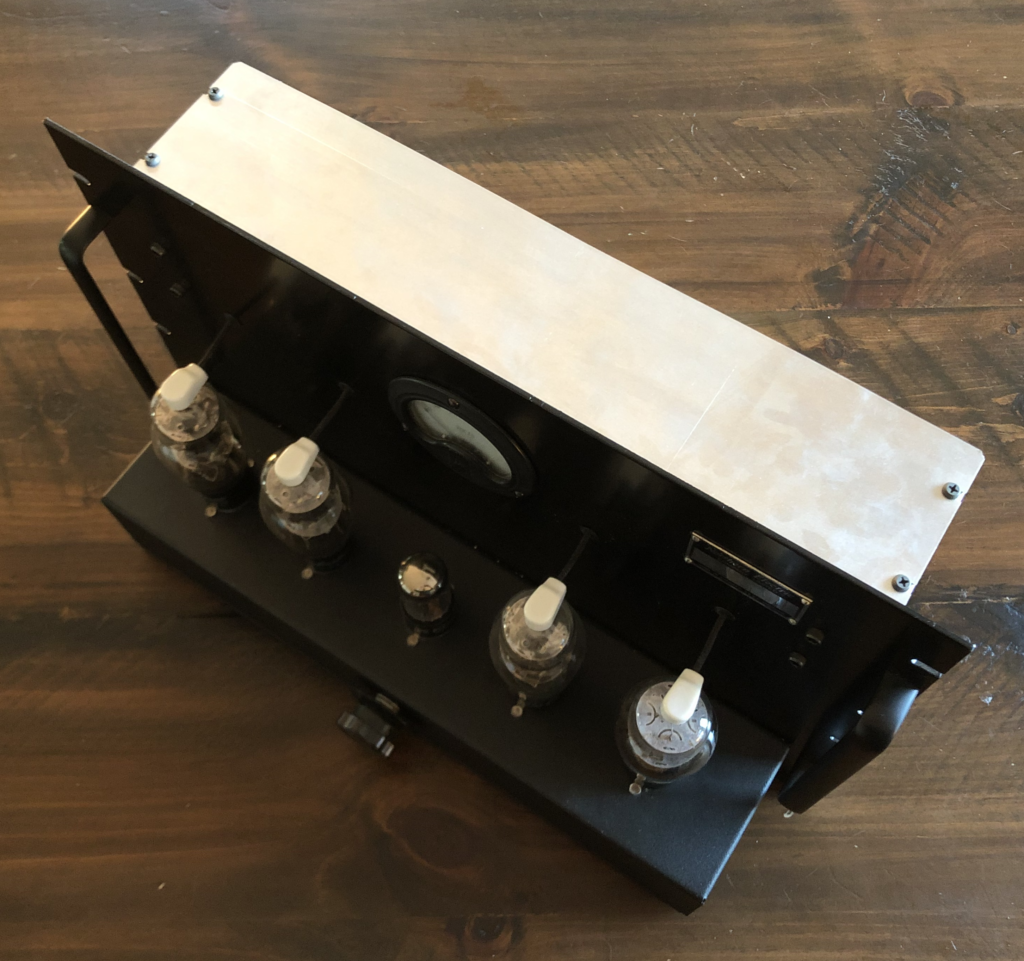
Back to my piece (above)… my goal was not, in any way, to make a copy of a 43A – it would be a fool’s errand, and not very practical – but rather to create a great-sounding and powerful stereo amp that honored the aesthetics of that iconic piece.
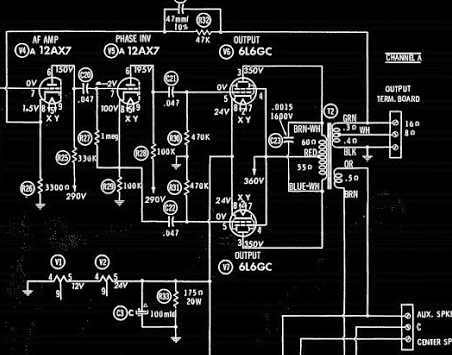
I wanted to use large, dramatic NOS tubes, but at a low cost; coke-bottle 6L6G would be nice but two matched pairs of those would be very pricey. So I subbed 6BG6GA instead. Basically a 6L6 with the plate in the top-cap. I chose the Altec 353A circuit (above), as I have built several Altec 323 and they sound great, and this is essentially the same circuit but using one fewer tube per channel. Since the mechanical construction of this thing was going to be a major PITA, I wanted to keep it as simple as possible electrically. The nameplate is a beat NOS “Northern Electric” mirror-finish plate that I found at Radio Hovsep a few years back.
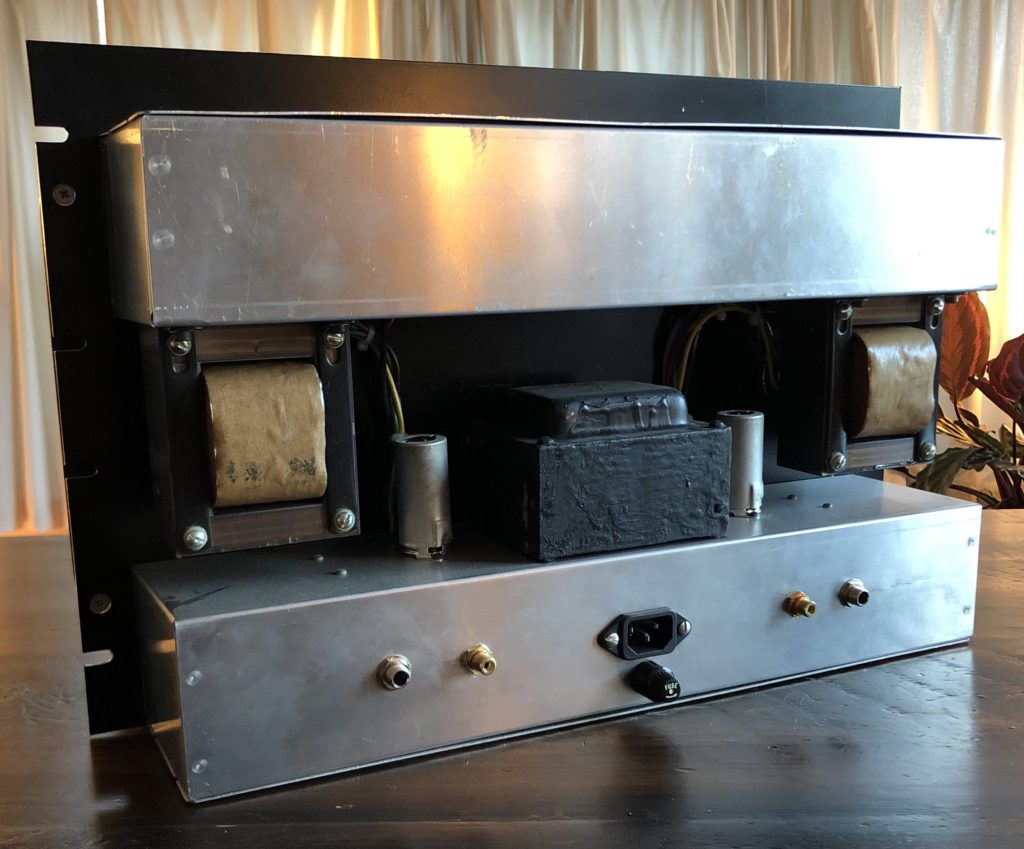
Here’s a shot of the rear. In order to keep hum induction to a minimum, I used aluminum wherever possible in the build. The output transformers (awesome nos 70s40-watt Schumachers with a great vintage look) are suspended from the top chassis in order to keep the plate leads as short as possible. The PT is a pull from an Eico ST70, which has more than enough current-handling ability for this device. The meter is a NOS 1930s 500VDC meter that displays plate voltage. The knob in the center is simply an on-off power control. I am assuming that this will be used with a preamp – probably a ’42 homage’ when I get around to it -although it gets plenty loud as-is with just a CD player connected to the RCA inputs.
This was a very difficult build in terms of the metal work. Getting all the various subchassis to line up was difficult but worth it in the end. It’s incredibly solid and has an imposing aura to it. The use of all Hammond-brand metal components ensured that the black finish(es) would all match and thereby present a unified appearance.
70’s months at P S DOT COM continues with a fresh scan of the complete 1976 Altec pro audio catalog, complete with pricelist. Presented in two parts due to file size.
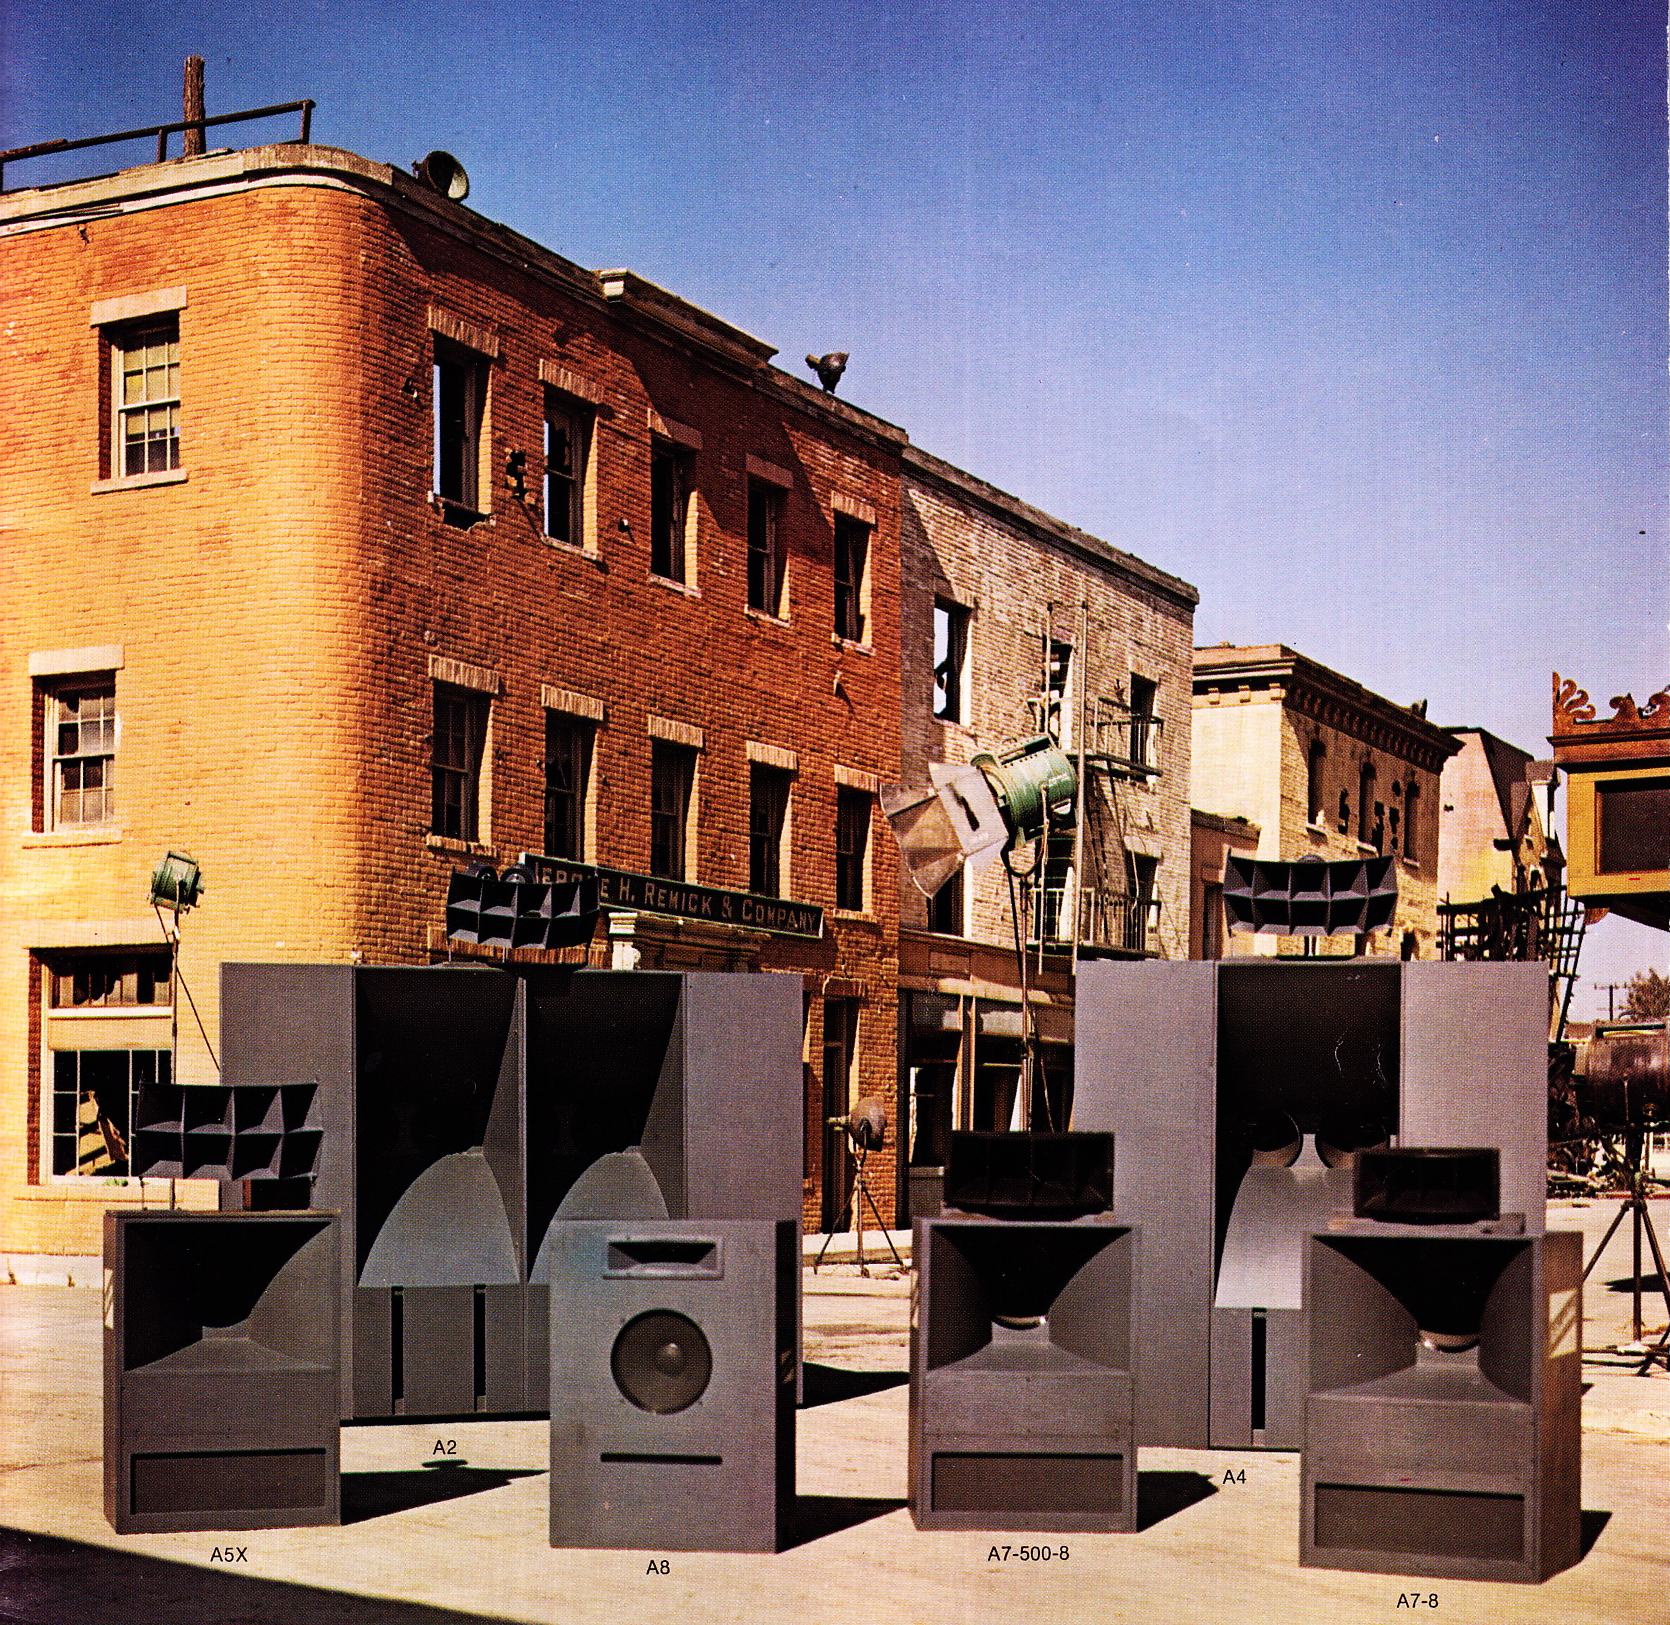
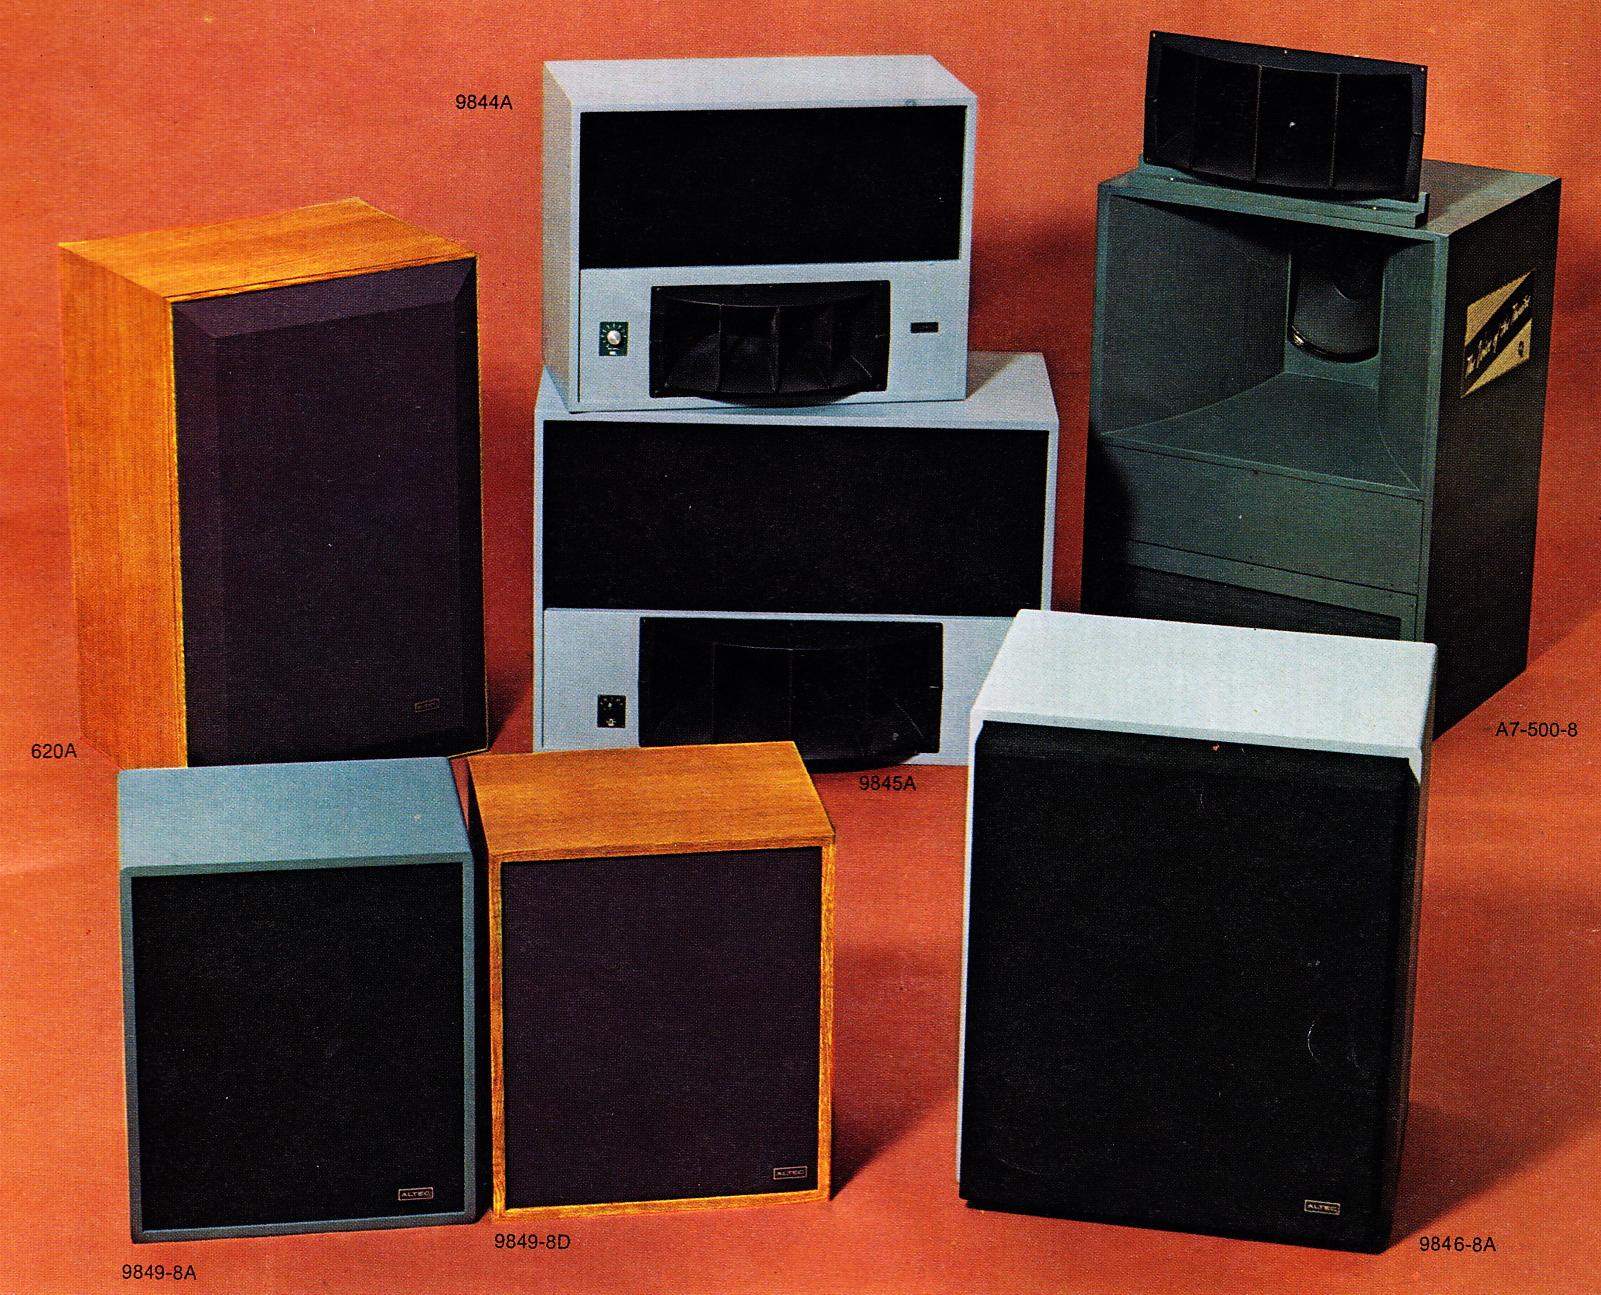
Above: Altec’s classic Cinema loudspeakers, including (LR) the 1,300lb A2 speaker.
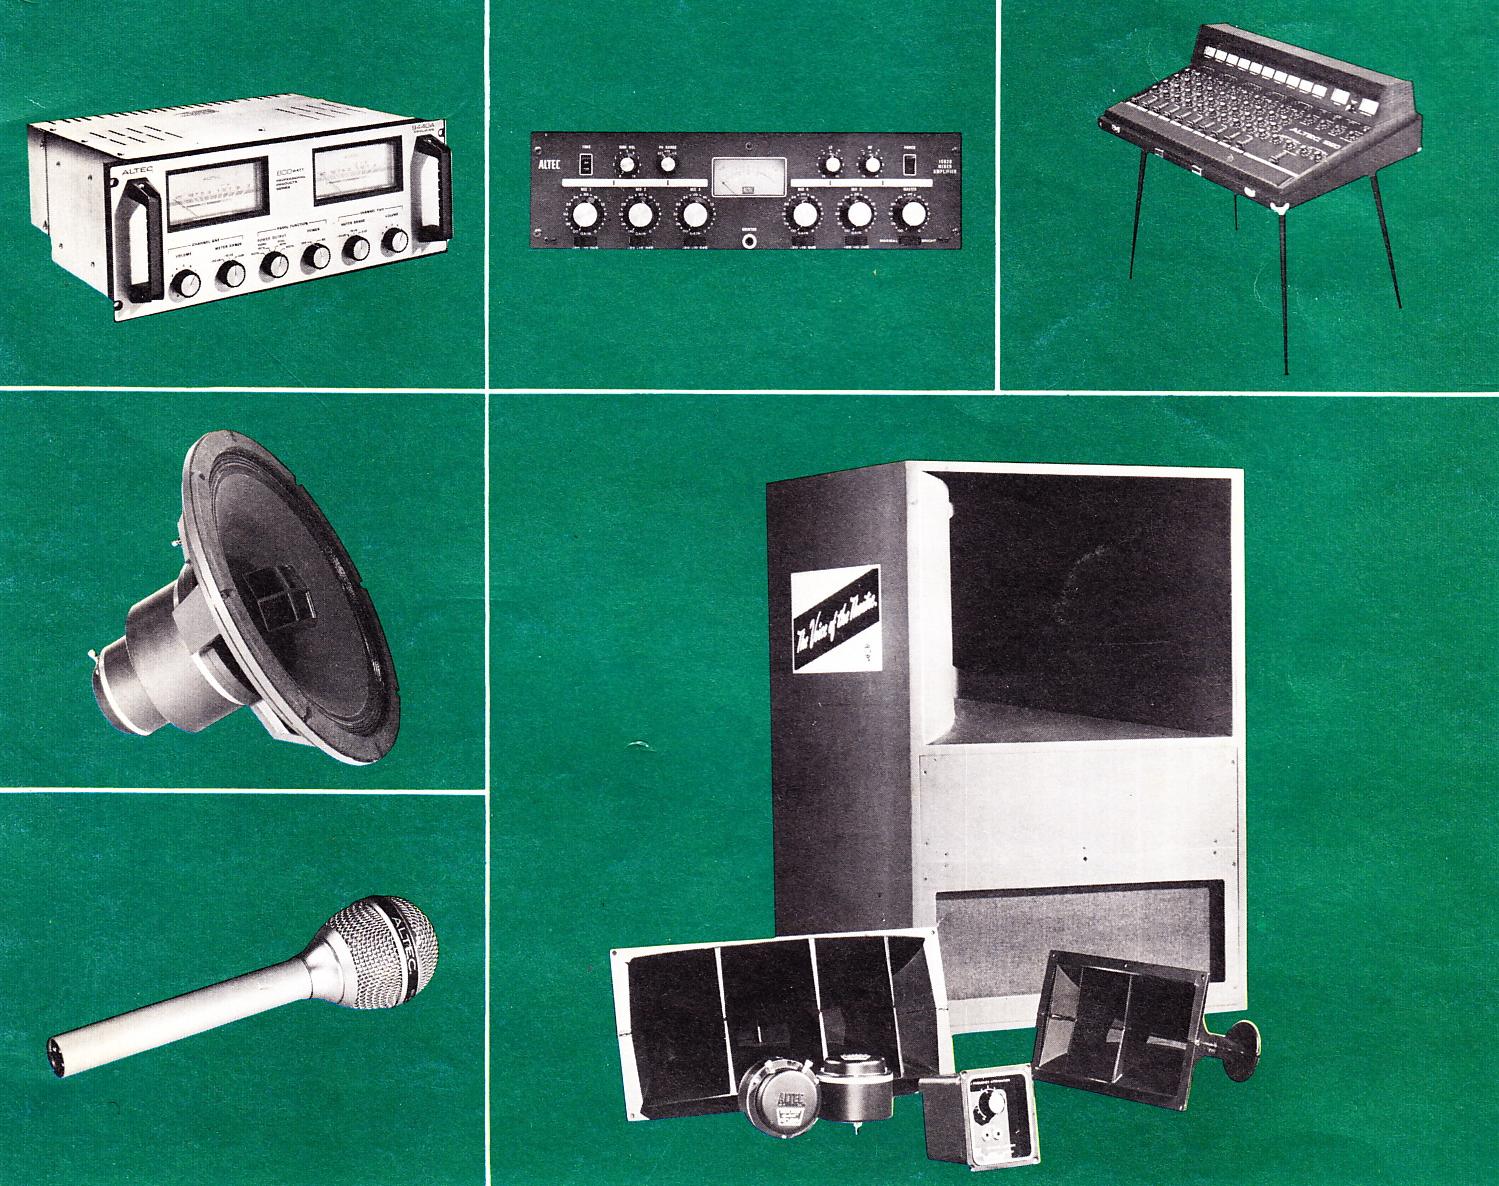
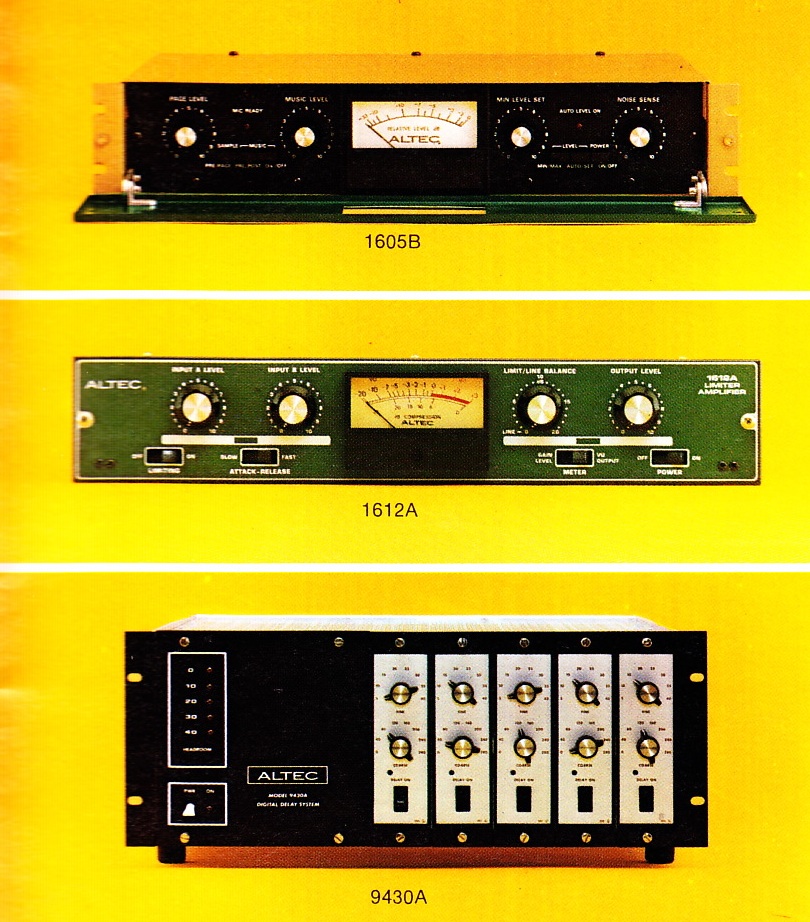
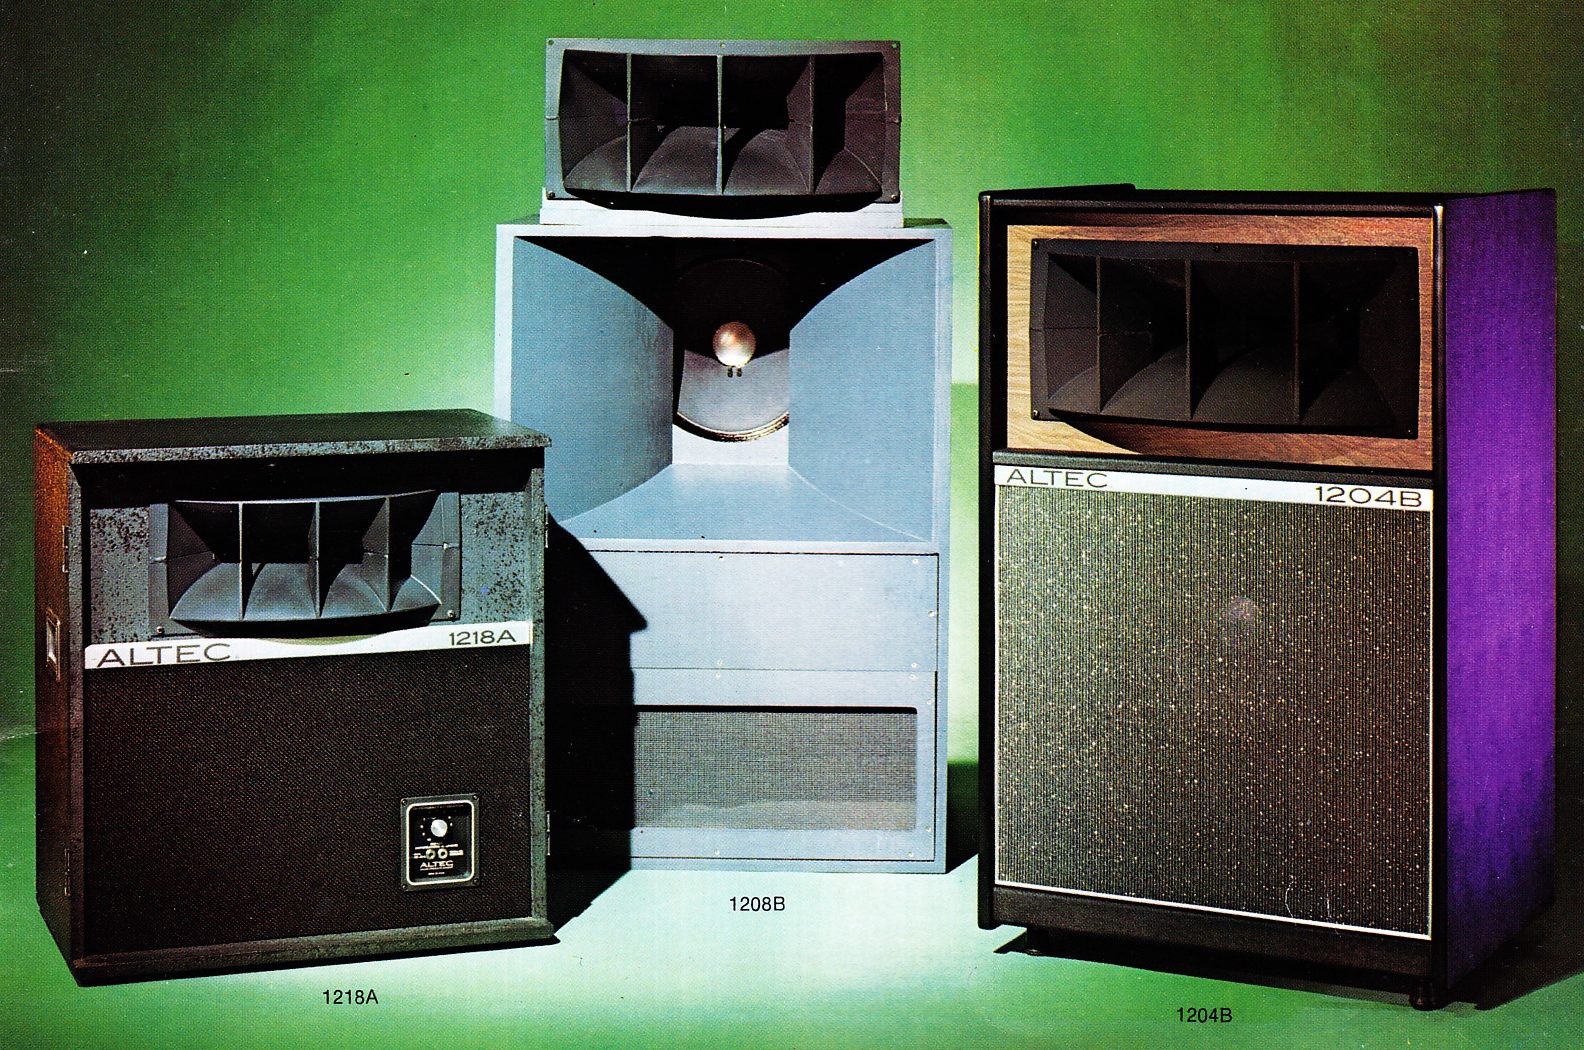
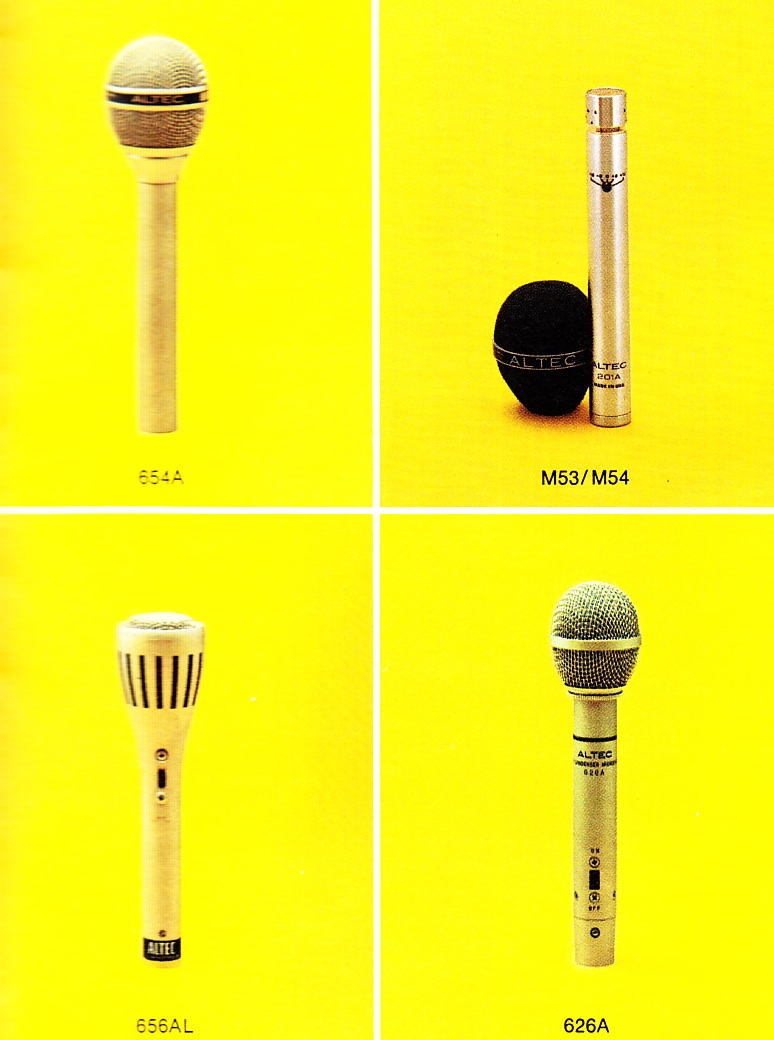
Products covered, with text, specs, and photos, include: Altec 1240B, 1208B, and 1218A ‘Voice of the Theatre’ speaker systems; 1221A stage monitor, 1219B speaker and 1224A Bi Amplifier, Altec A2, A4, A4X, A5X, A7-8, A7-500-8, and A-8 VOTT; Altec 9845A, 9844A, 814A, 849A, 210, 211A, 612C, 614D, 815A, 816A, and 828B speakers; 604-8G, 620-A, 9844, 9845A, 9849-8A, 9849-8D studio speakers, Altec 203B, 311-60, 311-90, 803B, 805B, 1003B, 1005B, 1505B, 32B, 511A, 511E, 31A, 511B, AND 811B horns; Altec 1211A and 1217A column loudspeakers; 417, 418, 421, and 425 musical instrument speaker; plus many many more speakers and speaker components. We also see the Altec 1220AC mono console, 351C, 1590C, 159B, 1594B, 9440A, 1224A, 1609A amplifiers and 1606A, 1607A, 1608A, and 1611A mixer/amps; Altec 1628A, 1592B, 1599A, and 1589A mixer/preamps; 1603 coupler, 1605A expander, 1612A compressor, 1650 EQ, 9430A digital delay (looks like a lexicon-made unit) and 9880A filter; a load of other bits and bobs, and microphones including the Altec 650, 654, 656, 655, 677, 676, 668, 699, M53, M54, 624, 626, and 687.
This promises to be an interesting unit. It’s designed (like a Shure Level-Loc) for Mic-Level-In, Mic-Level-Out, but that could pretty easily be changed for balanced-line operation by omitting the first 12AT7 stage and using a modest step-up transformer (maybe 1:3 or 1:5) going into the input level pot, and then adding another output stage and output transformer. (Since 1/2 of the 2nd AT7 is unused, I am thinking: eliminate one of the 12AT7s entirely, build this circuit minus the first stage using one 12AT7, and then add the output stage from the Altec 1566). The unit promises to add distortion, and there is some sort of low-pass network before the 3rd grid that will also need some sort of variable components added in order to control the quality of that distortion. My biggest question, though: will plain ‘ole IN4007 Diodes work in the circuit? I plan to build this thing soon and all questions will be answered… always looking for new (old) sources of novel grit+crunch….
Above: this one caught me by surprise. Neil Young endorses Altec PA kit in 1971. We see the Altec 1210A console and 1205A powered speakers. Apparently Don Ellis and Merle Haggard were also endorsers at the time.
Today: some early ‘seventies adverts for Altec PA gear. Altec equipment was no longer state-of-the-art studio gear by this period, but they seem to have enjoyed continuing success with sound reinforcement. For a full catalog download that discusses much of the equipment featured, click here and visit this earlier post.
Above: The Altec 1217A. Powerful enough for ‘Boogie Rock.’
Above: Altec’s young and photogenic employees circa 1974
Above: (it’s 1974): ‘Rock’s grown up. The Group’s grown up… Altec was there when the magic of rock and roll arrived. Woodstock. Monterey.”
Units discussed, with text, specs, and images, include: A150-C 4-channel preamplifier; 1530T power amp; 1520T amp; 625 and 629A speaker systems.
The Altec ‘Voice of the Theatre’ (VOTT) auditorium/theatre speaker systems are oft discussed; the A5 and A7 and all the other numerous variants (data on which can be found elsewhere on this site) provided high volume and excellent frequency response in large motion-picture-exhibition theaters in an era when amplifier power was limited by the available technology of the day. This unusual catalog provides a good look ‘backstage’ at the various bits+bobs that Altec made for the projection booth and as support for the VOTT systems.
Above: Belden 8411, 8422, and 8412 microphone cable. I still use Belden 9451 for most studio hard-wiring tasks, although I have to admit that I am very devoted to Canare StarQuad for actual mic cables. Anyone out there prefer Belden mic cable to the Canare?
Above: The Altec 680A omni dynamic. This one looks very strange. I am very curious to know what it sounds like. Anyone?
The Altec M20 condensor microphone. These seem to still be is use in studios. I hope I turn up one of them soon… folks seem to like them a lot.
NOTE: the above unit eventually did sell on eBay for $35,000. See below for scan…
Here’s something that you don’t see everyday. Courtesy of this eBay auction, an apparently original EMI-modified Altec 436B. Buy it now for $55,000 (fifty-five-thousand) US dollars. If this price seems absurd (and it surely is optimistic at best), I will point out that the seller claims (and he/she may very well be correct) that this particular unit was in fact used on numerous Beatles recordings. The particular quality of its compression, pumping, and mild distortion were integral to creating the vocal and drum sounds of the most widely-heard and widely-copied pop/rock recorded sounds in the entire history of sound recording. Add to that likely provenance the fact that only a handful of these units were ever made and you have a very unique piece of audio history on the block.
Here’s a shot of the rear of the unit. A few things worth noting: the JJ multicap (above the blue LCR cap) is of recent manufacture, indicating recent servicing. The lineup of three tubes and only two audio transformers indicates that this unit began its life as a 436(x) compressor, not a 438(x) mic pre/compressor. The mains transformer (far left) was necessarily replaced to facilitate easier use in a 220v country. My biggest question (and please, readers, fill me in… ) is: what is that unit above the 6AL5 tube? Is it a 2nd output transformer to allow of use of a T-pad attenuator on the output while retaining output balance (IE., the T-pad would go between the two transformers)?
Getting back to the front panel, we see evidence of the modifications that EMI made in order to make the 436B more useful in the studio. From left to right: a ‘balance’ push-button switch (not sure what this is, but i image it might have something to do with balancing the vari-mu action of the two halves of the gain-reduction tube? not sure how a pushbutton switch would be implemented there?). Next, a ‘recovery’ or ‘release’ control (self explanatory), then factory ‘input’ attenuator control, and to the right of the meter an output attenuator.
Anyway…those of you who have been following PS dot com for a while will know that I have a tremendous interest in these Altec compressors; I have restored them, modified them, scratch-built them, and use one regularly in the studio. Here’s some links to catch up:
L to R: Shure SM57; Altec 684 Omni; Altec 682 Cardiod; Altec 683 Cardiod
Altec made a great number of different microphone models in the 1950s and 1960s. A certain few of these are still widely used in recording studios today: most notably the 639 ‘Birdcage’ dual-element microphone (see here and here) and their various small diaphragm ‘Laboratory’ condensers (see here, here, and here).
During this period Altec also made a variety of conventional-looking dynamic microphones, some of which have quite good specs on paper. Today we’ll be having a listen to the Altec 682, 683, and 684.
I’ve prepared three stereo audio tracks which all document an identical solo guitar performance which we tracked in the big room at Gold Coast Recorders. In each of the three tracks, you will hear a new-ish Shure SM57 in the left speaker, and the selected Altec mic in the right speaker. I chose an SM57 as a reference because it is a microphone that most of us are very familiar with and it is often used to mic electric guitar amps. I placed the mics a big further back than I would generally use a dynamic-mic on a guitar amp in order to minimize any differences that might result from the slight variation in mic placement in relation to the amplifier. All signals were taken from the microphone into identical Sytek mic preamps and then directly into Aurora Lynx convertors and into Protools. No processing whatsoever was used other than minimal Digidesign MAXIM on the bounce-buss to ensure strong playback level; it was taking off 0.3db at most.
Levels were matched initially by running a 1K tone into the guitar amplifier and then fine-tuned on playback to within the tightest possible margin. The 684 Omni required 30% more gain to reach an equal level; the other three mics were within 5% or so of each other in terms of output.
Alright now that you’ve seen the setup, here is the audio:
Have a listen and draw your own conclusions. My quick assessment: the 682 sounds pretty similar to the 57, but IMO a lot prettier, a lot more detailed, and just more presentable in general. The 683 sounds thinner than the 57; bass is notably lacking and there is an aggressive character to the mids. Not sure that I would ever select this mic for anything. The 684 sounds like… an omni mic, so it’s not a valid comparison to a 57, but it does sound pretty decent as an omni. Might make a good under-snare microphone.
All of these forgotten Altecs are available cheaply on eBay from time to time. I’ve never come across one at a flea market or swap meet, though, so I don’t think they are very common. From what I can tell from my limited sample-pool, the ‘A’ designation after the model-number indicates that the mic uses an XLR5 (rather than the current standard XLR3) connector. If you get one of these ‘A’ designated mics, you will need to find an XLR 5 female jack. Wire an adapter to XLR 3 as follows: (XLR5:XLR3) 1:1, 2:3, 4:2. The ‘B’ designated mics seem to have our current-standard XLR3 jacks. Again, I am not 100% about this distinction, so check closely before buying if you don’t wanna be soldering adapters.